Go to the Case module by clicking on the Case tab.
The Case module enables you to create and organize your patients' case files, register prescriptions that you have made, and create and organize analyses.
Working with the Case module is like working with real case files.
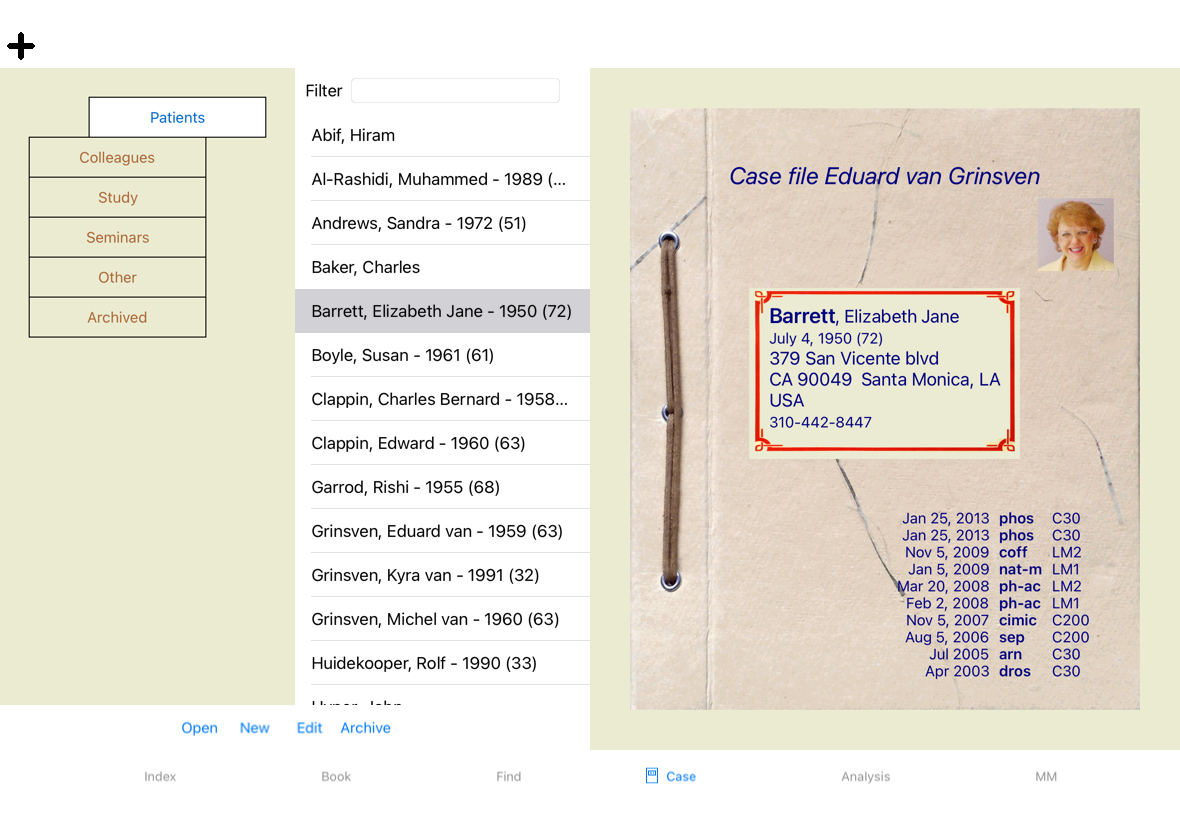
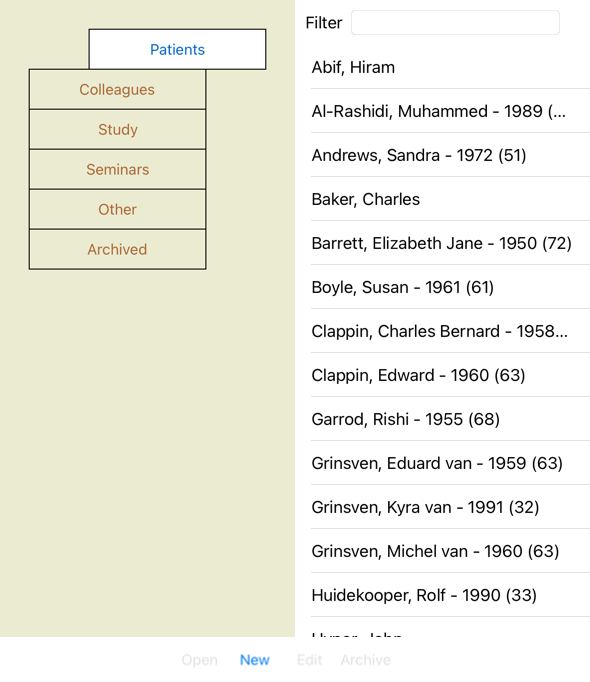
Cases are organized into groups, like you would organize your case files in different file cabinets or drawers in real life. You first select the group or groups you want to work in.
Cases in the selected groups are shown in a list, with only a summary of the patient information: Name and year of birth. The cases can be filtered by entering one or more parts of the patient name in the Filter field below the list.
Once a case has been selected in the list, the case file is shown on the right side of the screen.
The next step would be to open the case file, but we will first go into a few details about this part of case management.
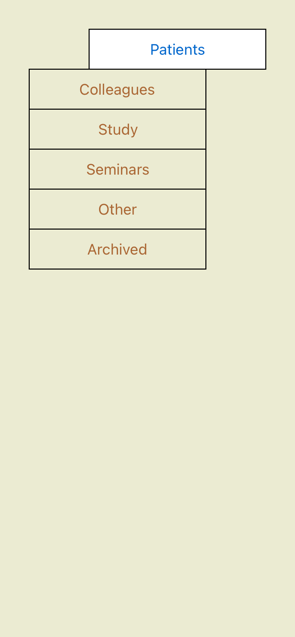
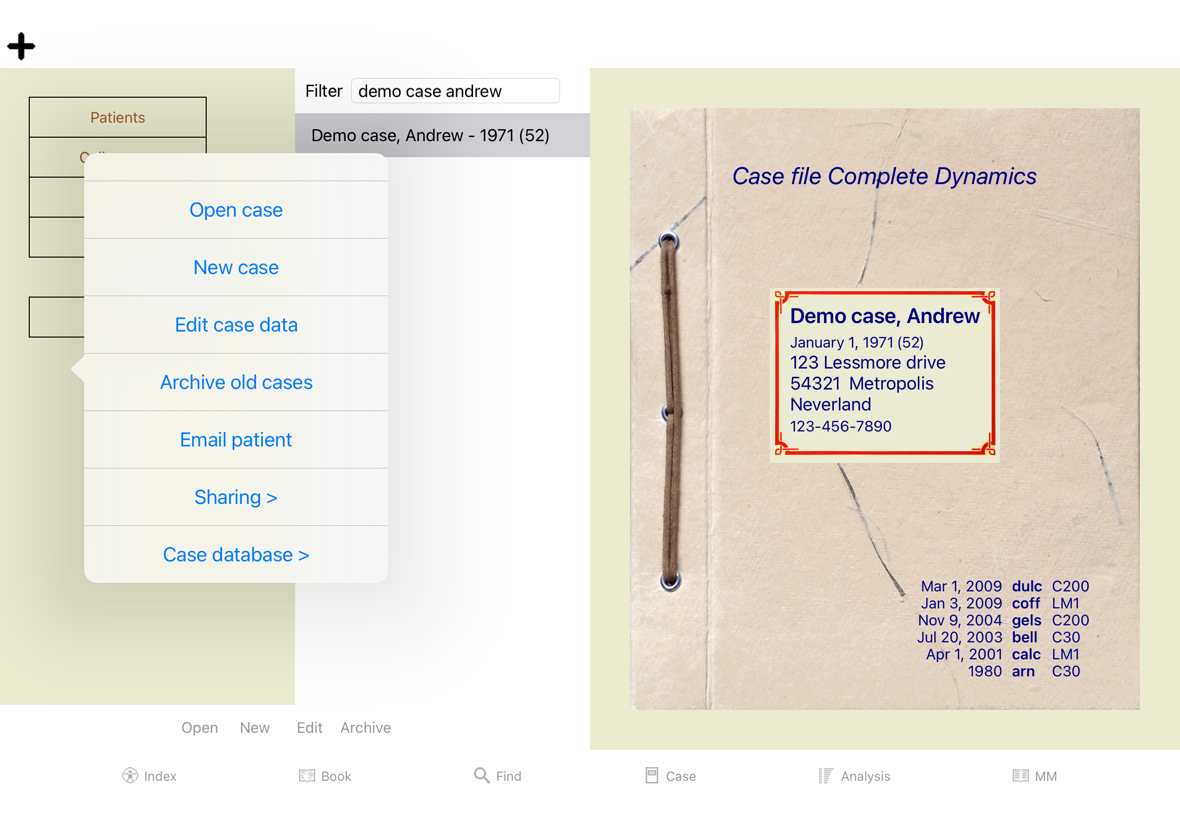
You can see the selector of groups as a kind of drawer cabinet.
In this picture, the Patients drawer has been opened. The standard groups are:
Patients All case files that are marked as Patient in the case description (more info below) and of which you are the author. Colleagues All case files that are marked as Patient in the case description and of which someone else is the author. Study All case files that are marked as Study. These are cases that are not directly related to any of your patients, but for your personal study only. Seminars All case files that are marked as Seminar. You create cases in this group for any cases that occur in seminars and trainings. Other All cases that do not fall into any other group. Archived All cases that you have archived.
Archived cases no longer appear in any of the other groups.
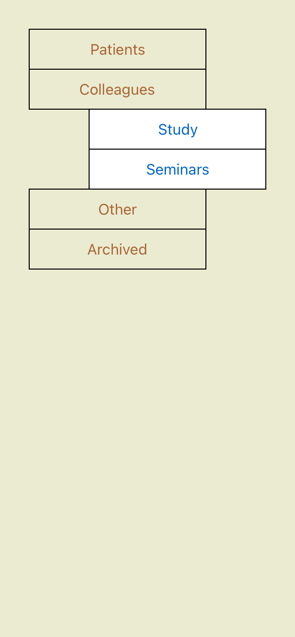
You can open one or more drawers at the same time. Just click on a drawer to open it or to close it. Double clicking on one of the drawers will open it and close all others at the same time.
Two drawers are opened. The list with cases will show all cases that are marked as 'Study' or as 'Seminars'.
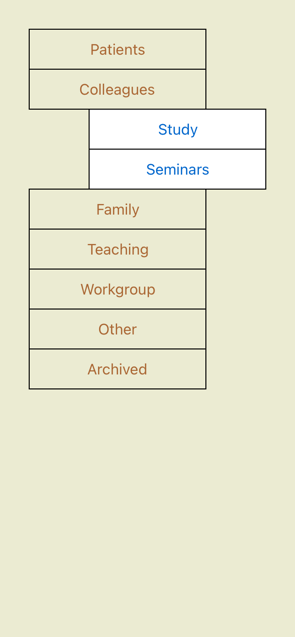
Of course these groups do not match your personal wishes. Creating new drawers with your own groups is easy. When editing the case information, you can specify which groups the case should be in. You can use the three standard groups 'Patient', Study' and 'Seminar', but you can also type your own group names. New drawers will be added to the list automatically:
The drawers Family, Teaching and Workgroup are added to the list automatically because in some of the cases these group names were used in the case information.
All cases that match the selected group or groups are shown in the list. If you fill in some text in the Filter field, the list is restricted to those cases that match the filter text.
An example of using the filter:
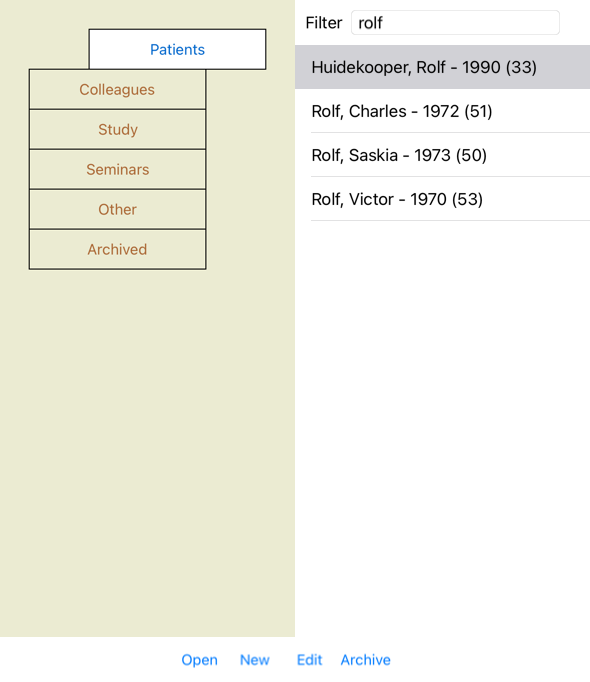

The filter has some very powerful options to select the right case. It uses the same filtering criteria as the Find field uses for text and remedies.
In the Case module, text is the name as shown in the list, and remedies are any remedies that have been prescribed to the patient (or have NOT been prescribed).
Please refer to section 'Find' field for details.
Example: To look for a patient named John or Joseph, who has been prescribed nux-v, but never sulph, just type:
john / joseph nux-v. -sulph.
(Note the dot behind the remedy names!).
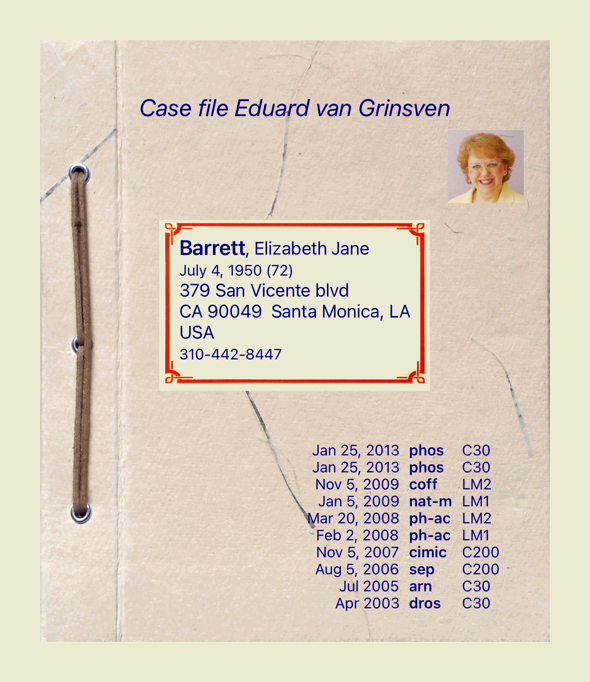
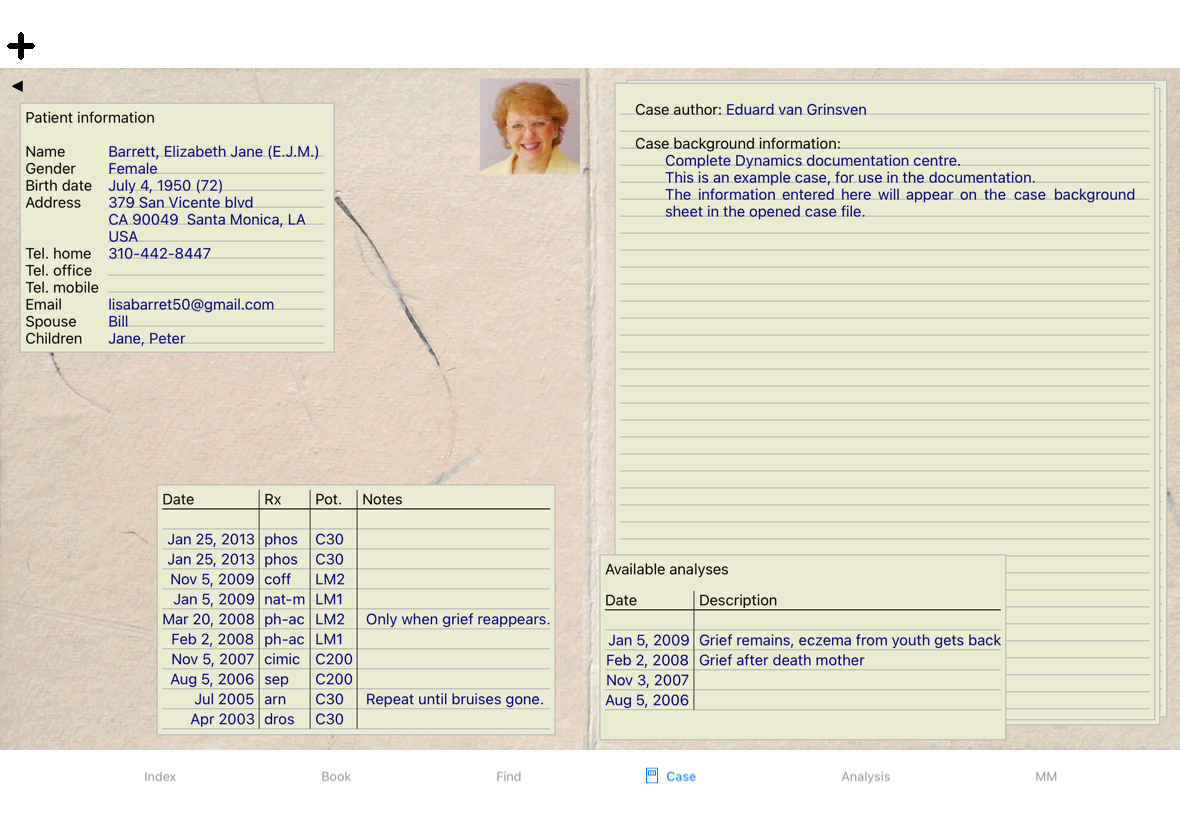
When you have selected a case file, part of the case information is drawn at the right side.
The information includes:
- Name of the author of the case.
- Patient information (name, address, birth date).
- A photo (if present).
- List of most recent prescriptions.
Example:
You can create a new case file by clicking the New button.
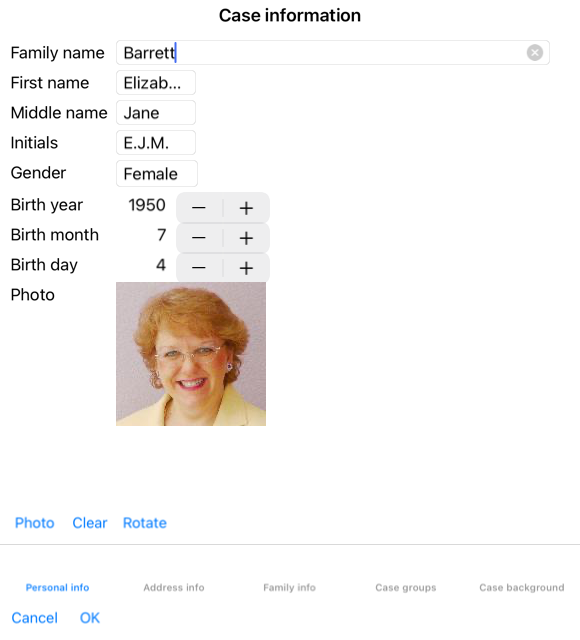
This will bring up a dialog where you can enter patient information, as well as case background information.
In the Patient section, you can fill in all personal information you want to store about the patient. Press the Photo button to take a picture. The photo is automatically resized. Remove an existing photo with the Clear button.
If the patient's birth year, month or day are not known, simply fill in 0.
In case the exact birth day is not known, but the patient only provides the current age, you can enter the age in the field Birth year.
If you fill in the patient's email address, you can easily send an email.
In the Case section, you can enter some background information about the case, that is not related to the patient itself.
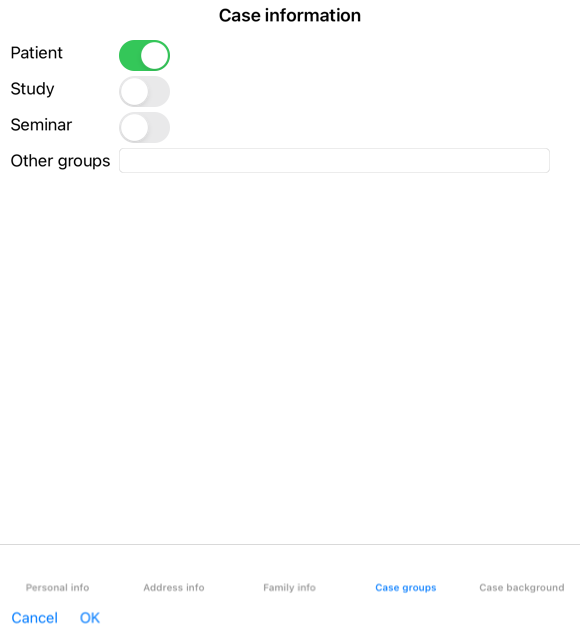
In the Case groups group, you can select one of the standard groups, and/or fill in your own group names separated by spaces or semicolons.
The Case background group is useful if this case originates from a seminar, magazine etc, and you want to remember where the case comes from.
You can open an existing case file by selecting it in the list, and then clicking the Open button.
You can also double click on the entry in the list.
When you create a new case, it is then automatically opened.
After opening a case file, it shows contents that you would normally expect inside a real life case file too:
- a piece of paper with patient information,
- a form with prescriptions,
- a form with an overview of all analyses in the case file,
- a sheet of paper for every analysis,
- a sheet of paper with case background information.
Example:
To close an open case, click on the small arrow ![]() in the upper left corner. (Popup menu option Close case).
in the upper left corner. (Popup menu option Close case).
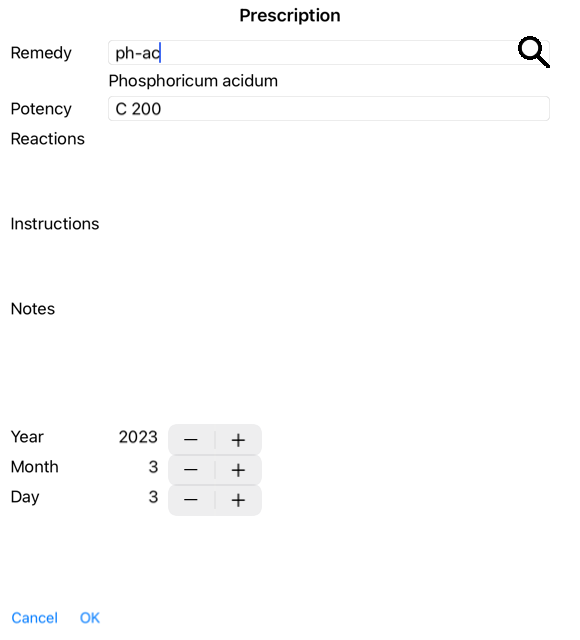
To add a new prescription, double click on the empty line at the top of the prescriptions. (Popup menu option Add prescription).
A new dialog will appear, where you can enter some information about the prescription:
The checkbox For future use can be used to indicate that you have not prescribed the remedy for immediate use, but have already given it to the patient for possible use in the future.
If the month or day are not known, simply fill in 0.
Delete a prescription by selecting it in the list, then Delete prescription. (Popup menu option Delete prescription).
Edit a prescription by double clicking on the entry in the list. (Popup menu option Edit prescription).
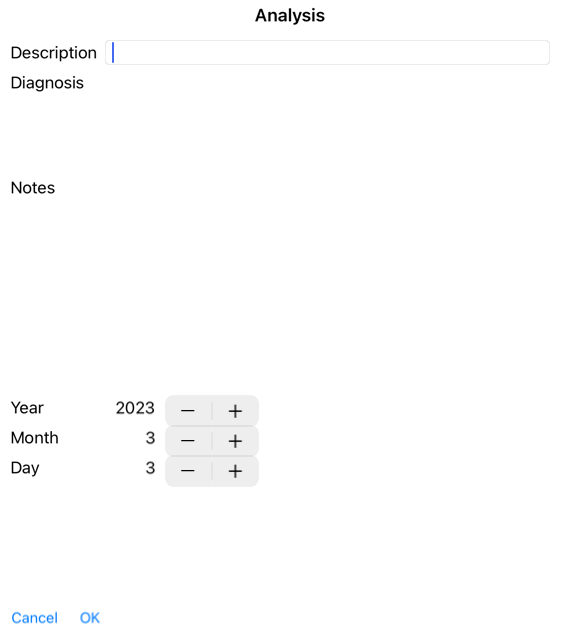
You can add a new analysis with a menu option, or double click on the empty line at the top of the analysis index. (Popup menu option Add analysis).
A new dialog will appear, where you can enter some information about the analysis:
If the month or day are not known, simply fill in 0.
Delete an analysis by selecting it in the list, then Delete analysis. (Popup menu option Delete analysis).
Edit an analysis by double clicking on the entry in the list. (Popup menu option Edit analysis).
If you want to copy an analysis, as the basis for a new analysis, use Duplicate analysis. (Popup menu option Duplicate analysis).
To move an analysis to another case, use menu option Move analysis to case. (Popup menu option Move analysis to case...).
If you click on one of the analyses in the list, this analysis becomes the one that is used by the Analysis module (see section Analysis).
You can print your case, or parts of it. (Popup menu option Print).
Printing a case is only possible after you have opened it.
A dialog allows you to select what you want to print:
| Case cover | If you check this option, the first page of the print will contain patient information, as well as an overview of prescriptions. |
| Current analysis | Select this option if you only want to print the currently selected analysis, with the settings as they are used in the Analysis module. |
| No analyses | Select this option if you do not want to print any of the analyses (just the case cover). |
| Analysis details | If you check this option, the information you entered for each analysis will be printed (diagnosis, notes). |
| Rubrics and remedies | If you check this option, every analysis print will contain an overview of all remedies in rubrics that are used in the analysis. Please note that due to copyright restrictions, at most 20 rubrics will be printed with all their remedies. If you print more than 20 rubrics, the rubrics with the most remedies will not list their remedies. |
| Color | Print in color. If not checked, printing is optimized for black and white printers. |
| Write to HTML file | Select this option to write to a HTML file. This is a convenient format if you want to copy parts of the output into other documents. |
If you have not opened a case, you can print an overview of multiple cases. (Popup menu option Print).
This can, for instance, be practical if you want to create a list for a colleague that monitors your patients. You could then make a list with just the names and birthdates of the patients you have seen in the last 6 months, with a list of remedy prescriptions.
The options in the printing dialog require no further explanation.
Your patient information can be protected against unwanted access by others, while you are away from your computer.
For this, you can set a password.
If a password has been set, a new button ![]() will appear in the Case module.
will appear in the Case module.
When you press that button, the case module will immediately be locked, and the password must be entered to open it.
It is also possible to automatically lock the case information, after you have not used the program for some time.
The time before automatic locking can be configured by you, in the Preferences settings.
If you set the time to 0 minutes, no automatic locking will be done.
Be very careful when setting a password. Besides you, nobody else knows your password. If you forget your password, it is like losing the keys to your house; no more access.
If you no longer want a case to be shown in the list of your cases, you can archive it.
After archiving a case, it will appear in the group Archived.
While it is archived, you can still open the case. If you make any changes to the case, it is automatically removed from the Archived group and put back with your other active cases.
You can archive multiple older cases. (Popup menu option Archive old cases).
In the dialog that opens, you can specify a number of months. A list shows all the cases that have not been modified for the given number of months. Next you can archive all the cases that are selected in the list.
If you no longer want to keep a case file, you can delete it.
A case can only be deleted after it has been archived.
It is also possible to have older archived cases be deleted automatically. There is an option for that in the Preferences settings. By default, archived cases are not automatically deleted.
If you unintentionally deleted a case file, you can restore it from a backup.
Backups are made automatically.
In case you use more than one computer for your practice, you may want to keep your case information synchronized between them.
This way, you will always have up-to-date case information wherever you work. Even if you're on the road, with your phone or a tablet.
Our Cloud Server offers a flexible and easy mechanism to automatically synchronize your cases.
Contrary to many other Cloud solutions, you can use Complete Dynamics both with and without internet connection.
Without internet connection, all your cases are stored locally on your device. All the changes you make are stored locally.
When an internet connection is available, your cases can be synchronized automatically via the Cloud Server.
If you make changes to cases on different devices, while not connected to internet, that does not make any difference. When the connection to the Cloud Server is available, all the changes you made on the different devices can be merged together. Even if you worked on the same case.
The purpose of the Cloud Server is to keep your cases identical on all the devices that use this service.
What you add on one device, will be added on the other devices.
What you change on one device, will be changed on the other devices.
What you delete on one device, will also be deleted on the other devices.
Archiving a case implies it will also be archived on the other devices.
This is you own choice.
If you use one computer, the Cloud Server can be used to secure a copy of your cases. In case your computer dies, the cases can automatically be transferred to your new computer.
If you use two or more devices, the Cloud Server can apply changes you made on one device to the other devices.
You decide for each device that you use, whether it should use the Cloud Server or not. For example, you could use the Cloud Server for the computers at home and in your office, but not for your phone.
We are aware that security and privacy are extremely important.
Your case data in very well protected.
You are not obliged to use our Cloud Server. We understand very well that maybe you do not want your patient's information to be stored somewhere on a remote computer.
It is totally your decision whether to use the Cloud Server or not.
We fully respect the privacy of you and your patients.
We won't use or process your data in any way. All the Cloud Server does is copying it to and from your devices.
To start using a device with the Cloud Server, you first have to activate it.
Activation is done in the Preferences, section Case. Here you can select the option Use Cloud Server.
If this is the first time you activate the Cloud Server, you are automatically guided to create the PIN that protects your case data. You can always change this PIN later.
Don't forget your Cloud PIN, you will need it when activating another device.
At the top of the page in the Case module, an icon indicates the state of the server connection.
The Cloud Server is available. Communication in progress. No internet connection, or the server is temporarily offline. if no icon is shown, the Cloud Server is not yet configured.
When you click on the icon, synchronization is performed immediately.
The purpose of the Cloud Server is to apply all changes made on one device, to all the other devices. But this is not always possible.
It will help you to understand what the restrictions are.
Especially when working off-line, it might happen that changes to the same case are made on different devices before a connection to the Cloud Server is reestablished. Normally, that would rarely pose a problem.
The information in a case is built up of several independent elements:
The cases stored on the Cloud Server are a copy of the cases on your device. The original data is on your device.
You are always responsible yourself for making backups of your computer.
It many situations, you may want to give one of your cases and/or analyses to a colleague, a fellow student, a teacher, or maybe publish it on an Internet forum.
Complete Dynamics offers you the possibility to export a case, full or only partial, to a file. This file can then be given to your colleague, and be imported on his/her computer. Your colleague does not need a Practitioner Edition license for this, with the free Browser Edition the file can also be imported and looked at.
Case sharing can also be done anonymously, thus ensuring the personal privacy of your patient and you.
How exporting and importing is done, is described below. First we'll look at another important feature of Case sharing.
Manual synchronization is relevant only if you have opted not to use the automatic synchronization via the Cloud Server.
With Case sharing, you get two powerful options to take cases from one computer to another.
The easiest way is to export a full copy of your case database on one computer, and import it on the other computer.
This replaces all case information stored on the other computer.
This option can also be used to regularly create a backup of your case database.
The more advanced way is to export only the cases that are modified on one computer, and import them on the second. In this situation, only the modified information is copied and merged into the database on the second computer. This powerful synchronization mechanism even works when a case has been modified on both computers!
Synchronizing cases between your iPad and your PC uses exactly the same mechanism as synchronizing between multiple PCs. The difference lies in the way that the export files are moved to and from the iPad.
Between two PCs, your can for instance use a USB stick to transfer the file. For your iPad, transferring files is done using the iTunes application on your PC.
In iTunes, files can be copied to and from Complete Dynamics on your iPad.
To do this, select your iPad in iTunes, and open the section Apps. Below the list of Apps, you will see a list of Apps that allow Files sharing. You should see Complete Dynamics in that list. Select the Complete Dynamics App by clicking on it. On the right side of the App, there is an area where you can add or delete files. A case export file created on your iPad will be found there and can be copied to your PC to be imported there. An export file created on your PC can be added here, and will then be available for import on your iPad.
For more information, please refer to the Help sections of iTunes.
On the iPad, the popup menu with the options desrcibed in the next sections, can be opened in the Case module, on the left side of the screen.
To export a single case, open the Case module and select the case that you want to export.
Then, use option Export current case... (Popup menu option Sharing / Export current case...).
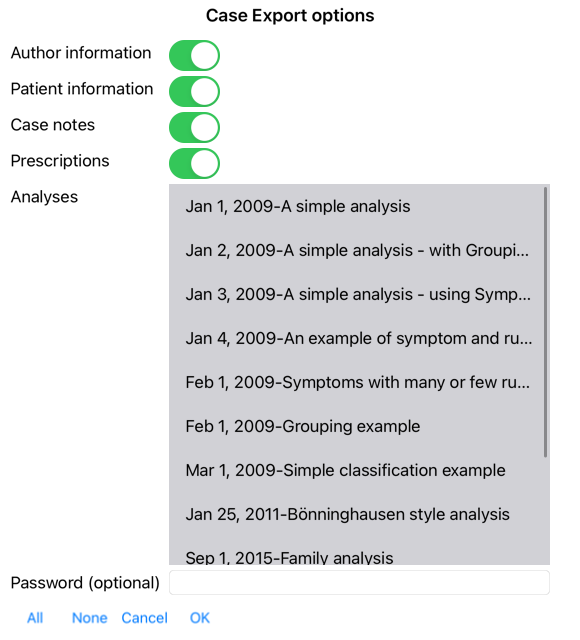
A dialog opens, allowing you to select which parts of the case you want to export:
| Author information | If you uncheck this option, your name is not included in the export. |
| Patient information | If you uncheck this option, the patient is made anonymous. Only the patient's gender and year of birth are used. If this option is checked, all the patient's personal information is included in the export. |
| Case notes | With this option checked, your case background information is included in the export. (Case background, notes, and groups). |
| Prescriptions | With this option checked, the prescriptions you have made are include in the export. |
| Analyses | For every analysis in the case, you can decide whether you want to export it or not. Click on a line to toggle the selection on/off. The buttons All and None can be used to select all or none of the analyses, for easier selection. |
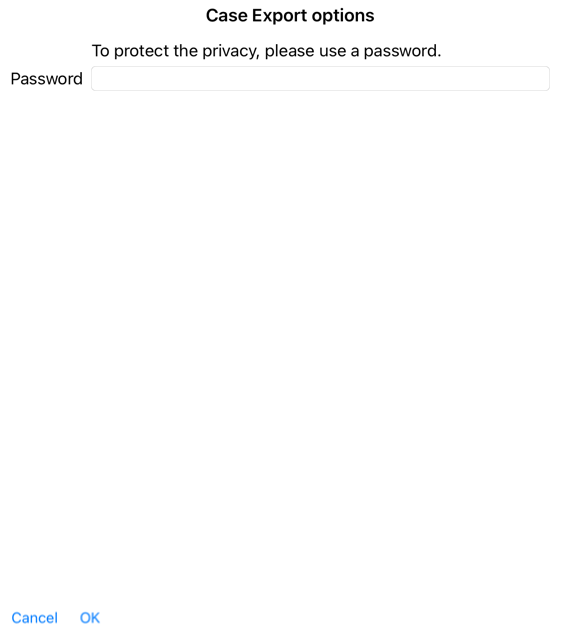
| Password | If you enter a value here, the export file is protected by a password. In order to be able to import it, someone has to know the password. We recommend to use a password for any information that you share, except for anonymous cases that you want to publish for everybody on the Internet. |
When you are ready, press the OK button, and you will be asked for a file name and location of your choice.
A default file name is already filled in, but you can choose any name you want.
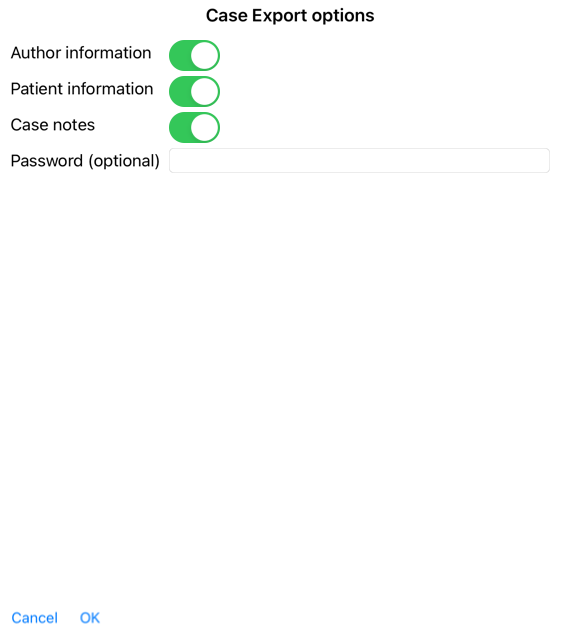
To export a single analysis, open the case that contains the analysis, and select the analysis you want to export.
Then, use menu option Export current analysis... (Popup menu option Sharing / Export current analysis...).
A dialog opens, allowing you to select which parts of the case you want to export together with the analysis:
For the meaning of the fields, see the information above.
You can export multiple cases into a single file. (Popup menu option Sharing / Export multiple cases...).
In the list with cases, select the ones you want to export by clicking on them.
When someone else has given you a case or analysis export file, you can easily import it with menu option Import. (Popup menu option Sharing / Import...).
You are asked for the file you want to import.
After selecting the file, it is imported into you case database. In case the file is password protected, you are asked for the password first.
You can find the imported case under group Colleagues if the author name was in the file, otherwise you will find it under group Other. After opening the case, you can easily change the case information yourself, or move an analysis to one of your other cases.
When you export your entire case database, it can only be imported on a computer that has a license that is registered under your name.
To export your entire case database, use menu option Export complete Case Database... (Popup menu option Sharing / Export complete Case Database...).
A dialog opens, allowing you to provide a password to protect this file (highly recommended).
After pressing the OK button, you will be asked for a file name and location.
Take the file to another computer, and there do Import.
Exporting modified cases is the most flexible way to synchronize case information between multiple computers.
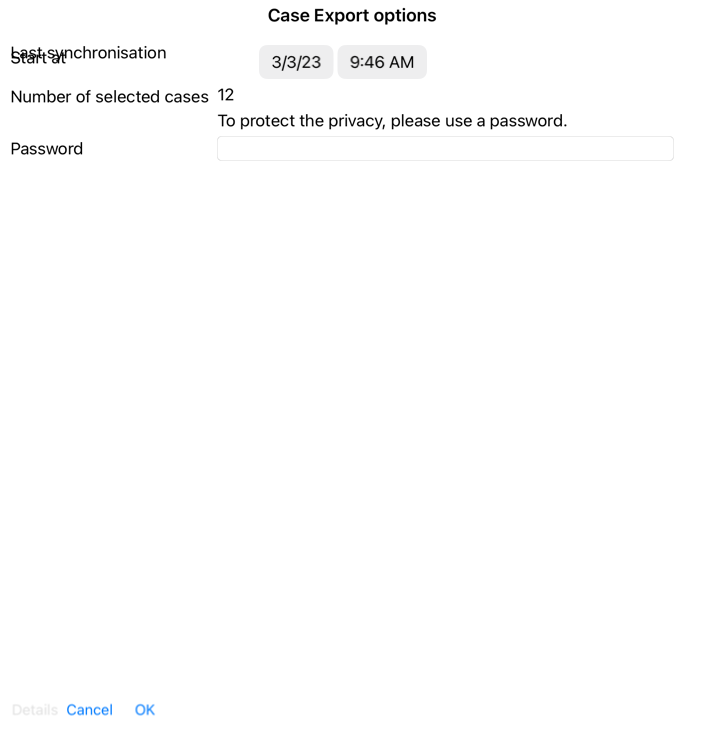
To export modifications, use menu option Export modified cases. (Popup menu option Sharing / Export modified cases...).
A dialog opens, allowing to to specify what needs to be synchronized:
By default, the date of the last synchronization is filled in. In case you want to synchronize all modification after another date and time, just change the value.
To get an overview of which cases will be included in the export, press the Details... button to get a list of the cases and their last modification times.
The modified cases can be imported on another computer. (Popup menu option Sharing / Import...).
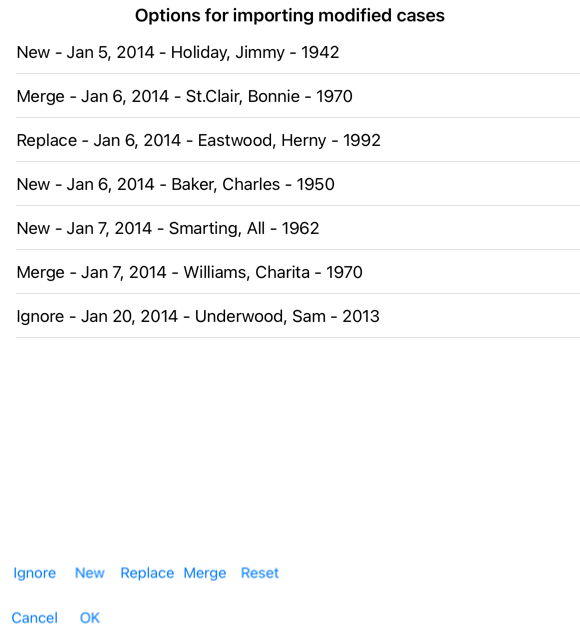
After selecting the file, a dialog opens showing information of the synchronization actions that are needed:
The important part here is the leftmost column. This column can have four different values:
| New | The case is not present in the local database. It will be newly created. |
| Replace | The case is not modified in the local database, but the version in the export file is newer. It will be overwritten with the new information. |
| Merge | The case has been modified on both computers. The information in the export files is merged into the information in the local database. No existing information is overwritten, but new information is copied in. |
| Ignore | This case appears not to be modified on any of both computers. Nothing is done. |
You can modify the action for any of the cases in the list. Select a number of cases by clicking on them, and then press any of the buttons Ignore, New, Replace, or Merge. Pressing button Reset will restore all actions to their original setting.
When an action is explicitly set to New, the case will be copied as a new case, even if a similar case is already present in the local database. You can do this when you are in doubt, after the import you will then see two cases with the same name that you can verify yourself. Normally, this is never necessary, the option Merge will not throw away any information.
In order to facilitate making backups, the program automatically creates a full case database export once every day. These backups are kept for the last 7 days. With this you can make your own backups, without having to know where the program stores its internal databases. In case you need to know more about where the backups are, and how to restore them in case of emergency, please contact the support department.