This chapter gives an overview of all functions in the Master Edition, not available in the Practitioner Edition.
This part is intended for users who already have experience with the Practitioner Edition and what to discover what is new in the Master Edition.
All the texts that follow in this chapter are also found in other places throughout the manual.
It is very easy to create your own repertory filters.
Your personal filters are configured in the Preferences, section Book.
To add a new filter, press the button ![]() .
.
Give the filter a meaningful name. This name will be added to the repertory filters under Menu / Book / Book selection.
By default, all authors are in the filter. To edit the list of authors, press the button Select authors.
Select the authors you want to allow in your filter. The most important authors are present in the list. To show all authors used in the repertory, uncheck the option Major authors only.
Below the list of authors, you can select a year range. Only sources published within the year range are included in the filter. The value 0 means the value is not used.
The other options for the filter do not need further explanation:
The repertory is generally represented in book form. This is convenient to look up rubrics and remedies, but only partly visualizes the structure of the repertory.
Using the Book Index tree, the hierarchical structure of the repertory can more easily be visualized and navigated.
In some situations, you might be interested to see how rubrics relate to other rubrics, based on similarities in their meaning. In such a cases, a graphical representation might be much easier.
A graphical repertory view for a rubric can be opened. (Menu option Book / Show as graph, ⌘-G, popup menu option Show repertory structure). You can also use the popup menu of the Book page module.
As an example, let's look at rubric Mind; Anger; evening agg.; trembling with, after eating. This rubric is built up of quite a few elementary elements:
- mental symptoms,
- anger,
- with trembling,
- worse in evening,
- worse after eating.
Since the rubric contains only a single remedy, it might be very interesting to consider similar rubrics with fewer of these elements.
The graphical view easily shows us the relation with other rubrics.
There are different graphical views, each serves a different purpose.
The vertical line of blocks shows the rubric levels, starting at Mind and ending at Trembling, with, after eating.
At the left side, you will find polar rubrics. In this example, you see the pair Amel. - Agg..
At the left side you will also find rubrics with more detailed symptom descriptions.
At the right side you see related rubrics.
If you double click on one of the rubrics, this will become the new selected rubric.
In the graph view, you can also add rubrics to the analysis. The option to do this is in a popup menu on the rubric.
To go back to the normal book view, click on ![]() or uncheck the menu option Menu / Book / Show as graph. The popup menu als contains an option Show as text.
or uncheck the menu option Menu / Book / Show as graph. The popup menu als contains an option Show as text.
This view limits the rubrics shown to only those rubrics who are similar to the selected rubric, but more generic.
It helps you to quickly select alternatives for detailed rubrics which contain only few remedies.
You can easily switch between the two different views. (Menu option Book / Show repertory structure, popup menu option Show repertory structure, menu option Book / Show generic rubrics, popup menu option Show generic rubrics).
You can quickly go back and forth between text and graphical repertory representation, without changing the selected graphical view. (Menu option Book / Show as graph, ⌘-G).
The Book module shows the repertory rubrics and remedies like in a printed book. This layout is convenient to read, but it does not show the rubric structure of the repertory.
In the Book module, you can show an additional Index Tree, showing the repertory structure. You can show or hide the Index Tree. (Menu option Book / Show book index, toolbar button ![]() ).
).
The Index Tree always highlights the rubric that is currently selected in the Book module. When you move to another rubric in he Book module, the Index Tree automatically adjusts itself. Likewise, if you select a rubric in the Index Tree, the Book module will move to the same rubric.
Note that the Jump to field also adjusts itself to show the currently selected rubric. These combined options give you maximum freedom and power to navigate through the repertory.
Sometimes a patient has a complete symptom, which happens to be in the repertory with the exact same level of detail. But more often, the symptom is not present with the same details, only partial or more generic.
As an example, let's look at rubric Mind; anger, vexation; evening; agg.; trembling, with, after eating. This rubric is built up of quite a few elementary elements:
- mental symptoms,
- anger,
- with trembling,
- worse in evening,
- worse after eating.
The rubric contains only a single remedy. It is quite likely that the remedy you are looking for will be found in one of the more generic rubrics, or could be found by combining a few of the more generic symptom components.
For example:
- Mind; Anger; trembling, with
- Mind; Anger; evening; agg.
- Mind; Eat, eating; after
Press the button ![]() to show an analysis, based on the related rubrics. The analysis is shown at the right side of the screen.
to show an analysis, based on the related rubrics. The analysis is shown at the right side of the screen.
For a rubric with no related rubrics, the analysis will simply show the list of remedies in the rubric, in the order of relevance, like they would be counted in an analysis. Of course this information can be very useful as well, but the purpose of the Remedy Suggestions feature is to help you think of alternatives to the remedies listed in the rubric.
To get an overview of the rubrics used in the analysis, including the details of remedies per rubric, press the button ![]() . A table style analysis will be shown.
. A table style analysis will be shown.
This temporary analysis is created in your current case, and will be deleted when you close the case.
You can make your personal additions to the repertory with our Repertory Editor.
The Repertory Editor allows you to create your own rubrics and add remedies to rubrics. You can also create new remedies that are not yet present in the current repertory.
You can add personal notes to rubrics, to be displayed with the rubric.
Each of these functions will be explained below.
The functions of the Repertory Editor are accesible through menu options in the menu bar, as well as menu options in the popup menus on rubrics and remedies.
For a few quick additions, these are very effective. In case you want to make multiple additions, you can open the Repertory editor assistant. We will explain the assistant after we discussed the different options.
To add rubrics, first open the Book module in the chapter where you want to create your rubric.
You now have the possibility to create a new rubric. (Menu option Book / Edit / Add rubric, popup menu option Edit / Add rubric).
To add a sub rubric to an existing rubric, first select the rubric by clicking on it, then create the sub rubric.
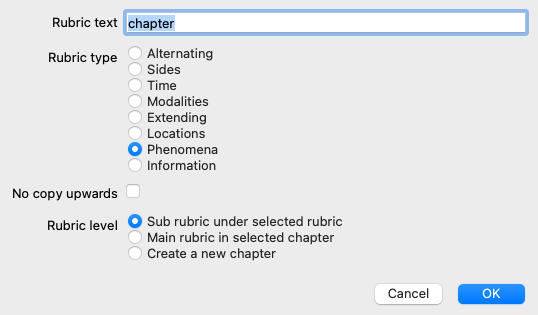
A dialog will open.
Please select the appropriate rubric type. You do not have to do this, but it will make your new rubric behave like other rubrics in the repertory. The rubric type is also used by the Analysis module, to better value the remedies in the rubric.
The option No copy upwards should be checked for a sub rubric which has an opposite meaning than the higher rubric. You commonly use this for a sub rubric that indicates an amelioration of a given symptom. An amelioration reverses the meaning of the upper rubric.
Checking this option will disable the automatic copying of new remedies to higher and more generic rubrics.
It is also used by the Analysis module, to see how a remedy occurs in related rubrics.
After creation, you can always modify rubric text and type. (Menu option Book / Edit / Edit rubric, popup menu option Edit / Edit rubric).
Note that you can only edit a rubric that has been created by you, not the original repertory rubrics.
You can remove a rubric that you have added. (Menu option Book / Edit / Remove rubric, popup menu option Edit / Remove rubric).
Note that you can only remove a rubric if it no longer contains any remedies or sub rubrics. This is to prevent accidental removal of valuable information.
To add a remedy to a rubric, first open the Book module and select the rubric to which you want to add a remedy.
You now have the possibility to add a remedy to that rubric. (Menu option Book / Edit / Add remedy, popup menu option Edit / Add remedy).
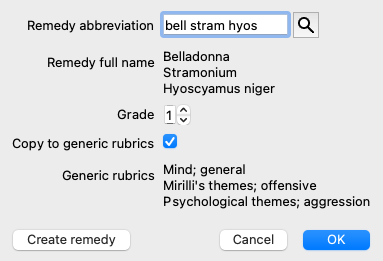
A dialog will open.
You can enter one or more remedy abbreviations. The corresponding full remedy names will be displayed below the field. The OK button will be disabled if you entered an incorrect abbreviation.
If the option Copy to generic rubrics is selected, the remedies will automatically be added to rubrics that are more generic than the selected rubric. These rubrics are listed below that option.
In case you want to add a remedy that does not already exist in the repertory, you can create it with button Create remedy.
You will be prompted for a remedy abbreviation and a full name. The remedy abbreviation you wish to create must be an abbreviation that does not already exist in the standard repertory.
After creating your new remedy, you can always change its abbreviation or name later. (Menu option Book / Edit / Edit remedy, popup menu option Edit / Edit remedy).
If you want to increase the grade of a remedy in the standard repertory, just add the remedy with a higher grade. Your higher grade will become more important than the original grade.
You can remove a remedy addition. (Menu option Book / Edit / Remove remedy, popup menu option Edit / Remove remedy). Note that you can only remove a remedy that has been added by you. Removing a remedy only removes you as the author. If there are remaining other authors for the same remedy, the remedy itself will not be removed from the repertory.
You can also remove all your remedy additions in a rubric. (Menu option Book / Edit / Remove all remedies, popup menu option Edit / Remove all remedies).
Instead of quickly adding a number of remedies with the selected grade, it is also possible to explicitly specify the grades of individual remedies.
There are a few ways to override the selected default remedy grade.
The following examples show how to add remedy bell with grade 2, cham with grade 3, and dig with grade 4.
The latter method is the format used when copying a rubric and its remedies to the clipboard. This mechanism enables you to quickly copy the remedies from another rubric. On the other rubric, copy rubric and remedies and then paste into the remedies field. (Menu option Book / Copy / Copy rubric and remedies, popup menu option Copy / Copy rubric and remedies).
These additional mechanisms to specify remedy grades can be extremely powerful when importing remedies that you want to copy from external sources.
By default, all remedies you add to the repertory are labeled with you as author. For your personal repertory additions, this is most likely what you want. If you are adding remedies from other source material, like books or seminars, you might want to specify the author explicitly.
You can add a new author. (Menu option Book / Edit / Source / Create new source, popup menu option Edit / Source / Create new source).
You can select one of the authors. (Menu option Book / Edit / Source / Select source, popup menu option Edit / Source / Select source). After selecting an author, this will automatically become the author for new remedy additions.
You can edit the details of the selected author. (Menu option Book / Edit / Source / Edit source information, popup menu option Edit / Source / Edit source information).
When you activate the toolbar button ![]() , your personal additions will be highlighted with a light green color. This way, you will be able to quickly see which remedies have been added by you.
, your personal additions will be highlighted with a light green color. This way, you will be able to quickly see which remedies have been added by you.
It is also possible to see only your personal additions, without all the other remedies. To do this, you can create a personal repertory filter, selecting yourself as the only author.
You can add a personal note to any rubric. (Menu option Book / Edit / Add rubric note, popup menu option Edit / Add rubric note).
The presence of a note will be shown by a ![]() following the rubric text.
following the rubric text.
To see the note, just move your mouse over the rubric text, or double click on the ![]() image.
image.
You can edit or remove your personal notes. (Menu option Book / Edit / Edit rubric notes, popup menu option Edit / Edit rubric notes). A dialog will open, which will need no further explanation.
Just like you can add notes to a rubric, you can also add notes to individual remedies. There are additional functions for that. (Menu option Book / Edit / Add remedy note, popup menu option Edit / Add remedy note).
A cross references is a reference from one rubric to another rubric. To create a cross reference, you first have to select the origin rubric, then the destination rubric.
Select the rubric by clicking on it, then mark it as the origin rubric. (Menu option Book / Edit / Cross Reference / Select rubric as cross reference origin, popup menu option Edit / Cross Reference / Select rubric as cross reference origin).
Next, select the destination rubric and mark it. (Menu option Book / Edit / Cross Reference / Select rubric as cross reference destination, popup menu option Edit / Cross Reference / Select rubric as cross reference destination).
A dialog will open, showing you the origin rubric and the destination rubric, with a button to add the cross reference.
To remove a cross reference, follow the same procedure. The dialog will then show a button to remove the cross reference.
You can also simply click on the cross reference, and then remove it. (Menu option Book / Edit / Cross Reference / Remove cross reference, popup menu option Edit / Cross Reference / Remove cross reference).
Note that you can only create cross references inside a single repertory. You cannot create cross references from a rubric in one repertory to a rubric in another repertory.
Your personal repertory additions are by default stored in a file called repertory_additions.rep.
This file is stored in the Complete Dynamics folder, under your Documents folder.
It is possible to create multiple repertory files. Using multiple repertory files has several advantages.
To share a collection of repertory additions with another person, all you need to do is give the other person a copy of your repertory file. You can of course also put your additions file somewhere on the internet, so everybody can use it.
The other person can then place the file in the Complete Dynamics folder, and start Complete Dynamics. Your repertory additions will then automatically appear in the repertory.
You can easily create a new repertory file. (Menu option Book / Edit / Repertory file / Create new repertory file, popup menu option Edit / Repertory file / Create new repertory file).
A dialog will appear, allowing you to specify the details of your repertory additions.
In the section Repertory, you can enter information about the origin of the repertory additions.
Author is the person whom the information originates from. By default, your name is already filled in. If the information comes from another person, use the other person's name (for instance: Kent, James Tyler).
Title should give a description that identifies the origin of the information.
In the section Editor, enter the details of the person who edited the repertory additions. By default, your name is filled in. In some situations, when editorial work is continued by another person, it can be necessary to change this information.
To create a stand-alone repertory, which will exist alongside the main repertory, select option Repertory type: Independent repertory.
Some extra fields appear, which are specific to independent repertories.
You can change the information about a repertory file. (Menu option Book / Edit / Repertory file / Edit repertory file information, popup menu option Edit / Repertory file / Edit repertory file information).
By default, any additions you make are stored in the file called repertory_additions.rep.
If you want to work with one of the other existing files, you first have to select that file. (Menu option Book / Edit / Repertory file / Select repertory file, popup menu option Edit / Repertory file / Select repertory file).
A dialog opens, showing the available repertory files.
In the list on the left side, you can select a repertory file. The right side will then show a preview of which repertory additions are in the file.
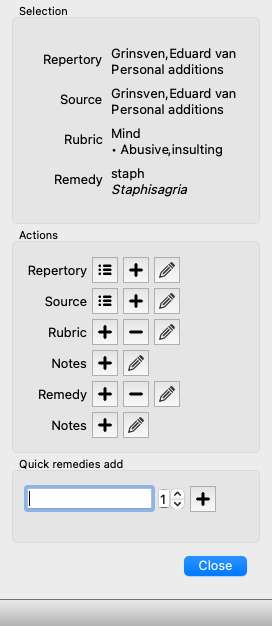
In case you want to make multiple repertory additions, it can be convenient to use the Repertory editor assistant. (Menu option Book / Edit / Open repertory editor Assistant, popup menu option Edit / Open repertory editor Assistant).
The section Selection indicates which rubric has been selected in the Book module, and when applicable which remedy has been clicked.
The section Actions contains buttons for all the functions that you would otherwise access from a menu.
The section Quick remedies add allows you to quickly add a number of remedies to the selected rubric. This function requires all remedy abbreviations to be correct. The remedies will automatically be added to all more generic rubrics. See Adding remedies (above) for more information.
With the Repertory Importer module, you can import repertory entries in bulk, from an external file. The Repertory Importer recognizes several data formats, which are described below.
Before starting the Importer, you must have created a Repertory Additions file, and select it. (Menu option Book / Edit / Repertory file / Select repertory file, popup menu option Edit / Repertory file / Select repertory file).
After you have selected the repertory file in which you wish to import the external data, you can start the Repertory Importer. (Menu option Book / Edit / Repertory file / Import from an external file, popup menu option Edit / Repertory file / Import from an external file).
The Importer module now opens.
The first step is defining the input text format. Each format is defined is a separate paragraph below. For each format, there are example files. You can find these files in folder Documents / Complete Dynamics / Examples.
All the example files have different formats, but they define exactly the same repertory rubrics and remedies.
The next step is importing the text into the Repertory Importer.
The input text that you want to import, must conform to the defined format. In the file, select all the text and copy it to the clipboard.
Then, in the Repertory Importer, press button Paste. The copied text will appear in the large white space. If there is a problem with the text, change it in the original document and copy/paste again.
After importing the text, press the Validate button to do some first tests. If any errors are found, these must first be corrected before you can continue.
In case your repertory contains remedy abbreviations that are not present in the Complete Repertory, you can now define which remedies they are. You define the unknown remedies using the Remedies... button.
Once there are no more errors and all remedies are correctly defined, you can import the repertory with the Import button. Then, close the Repertory Importer with the Close button.
Please note that importing will remove the entire contents that was previously in the repertory file.
This format is used by MacRepertory, to define additions. Selecting this format does not require any other settings to be defined.
Please look at the examples for details. With the examples, there is also a file that gives more information about the file formats.
In this format, the first columns define the rubrics. The last column holds the remedies.
Just look at the examples, it is easy.
In this format, the remedy grades are defined by the text styles.
You can also define the text fragment that separates the rubric label from the remedies.
For each remedy grade, you can define the format. Below the settings, you see an example of what the formatted text looks like with the selected settings.
The rubric hierarchy is defined by indenting the text. This can be done in diffent ways.
There are example files for each indentation method.
You can quickly recall a previous find by clicking on the History... button. This will open a dialog with a list of previous find queries.
Your find can now be extended to searching in the Materia Medica books.
Instead of only looking for individual remedies, it is now possible to search for remedy groups, like spiders. In the Remedies field, enter {spiders}.
Several new fields are available in the Find module.
Please see section Find fields for details.
When the option Use word synonyms is checked, every word in the text field is extended with synonyms for that word.
For example: when looking for the text 'child', synonyms could be: infant, son, daughter, baby, boy, girl, youth, offspring, newborn, teenager.
This way, more rubrics will be found than the ones that strictly match the words that you typed. Sometimes this might be what you want, in other situations you might want your search to do exactly like you wrote.
Currently, word synonyms are available only for the English language. If you have suggestions about missing or incorrect synonyms, please let us know. Building the right synonym definitions is an ongoing process of improvement.
Complete Dynamics offers you the possibility to define your own lists of word synonyms.
Your own word synonyms are defined in one or more (unformatted) text files, that you keep in a special folder. The folder is named Complete Dynamics. On Windows it is located in your My Documents folder, on OS-X in your Documents folder.
An example file called synonyms_example.txt is preinstalled in that folder. In that file, you will find examples of how synonym definitions are made.
Synonyms can also be made for other languages than English.
If you want to share your synonym definitions with other users, all you need to do is send them your synonym definition file. When the other user installs the file in the aforementioned folder, the synonyms will automatically be available after stopping and restarting the program.
The texts and remedies that are searched for in the Find module, can easily be highlighted. (Toolbar button ![]() ). When highlighted, these text and remedies can be located very quickly when looking at the screen.
). When highlighted, these text and remedies can be located very quickly when looking at the screen.
Highlighting can be applied in the Find, Book and Materia Medica modules.
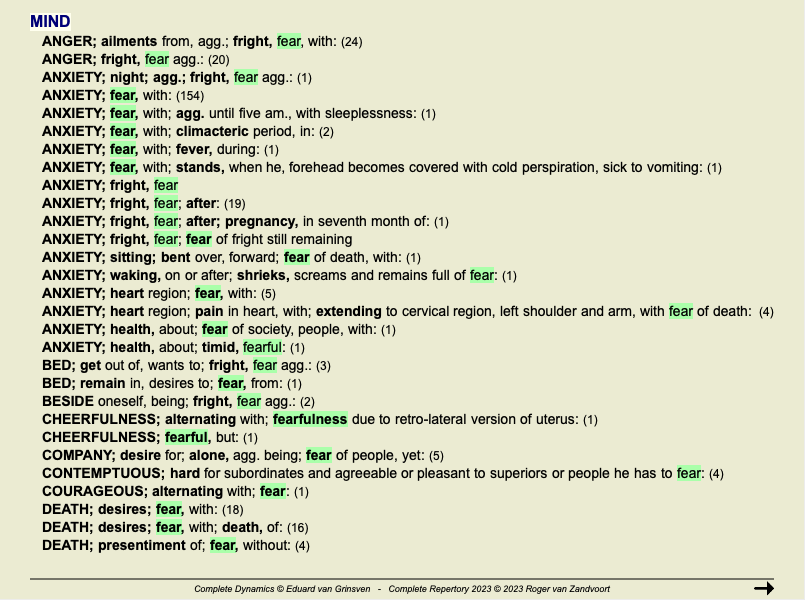
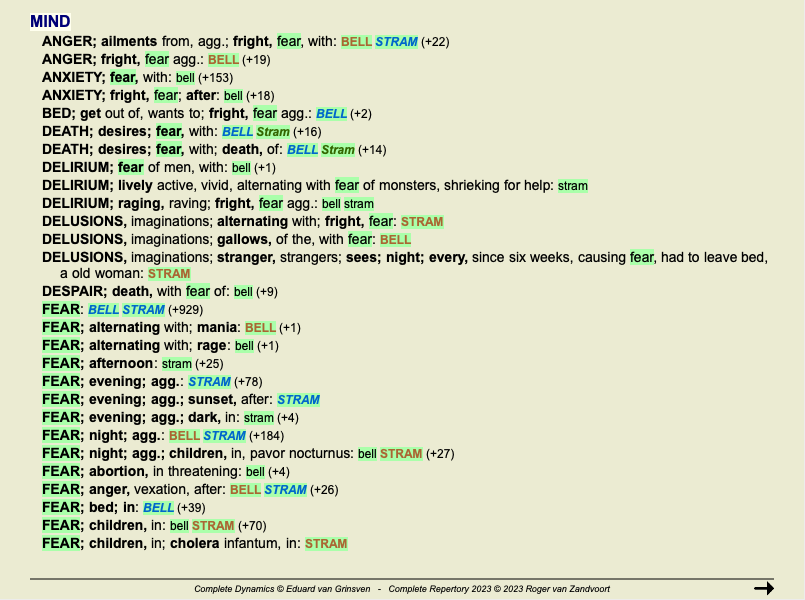
With highlighting switched on, the text elements of your query are highlighted in the Find result list.
As an example, the text 'fear' is searched for. Note that 'fear' in the Find module means 'any word beginning with fear'. Therefore, the words 'fear', 'fearful', 'fearfulness' are also found.
The next example shows looking for 'fear' plus any of the remedies 'bell' or 'stram'.
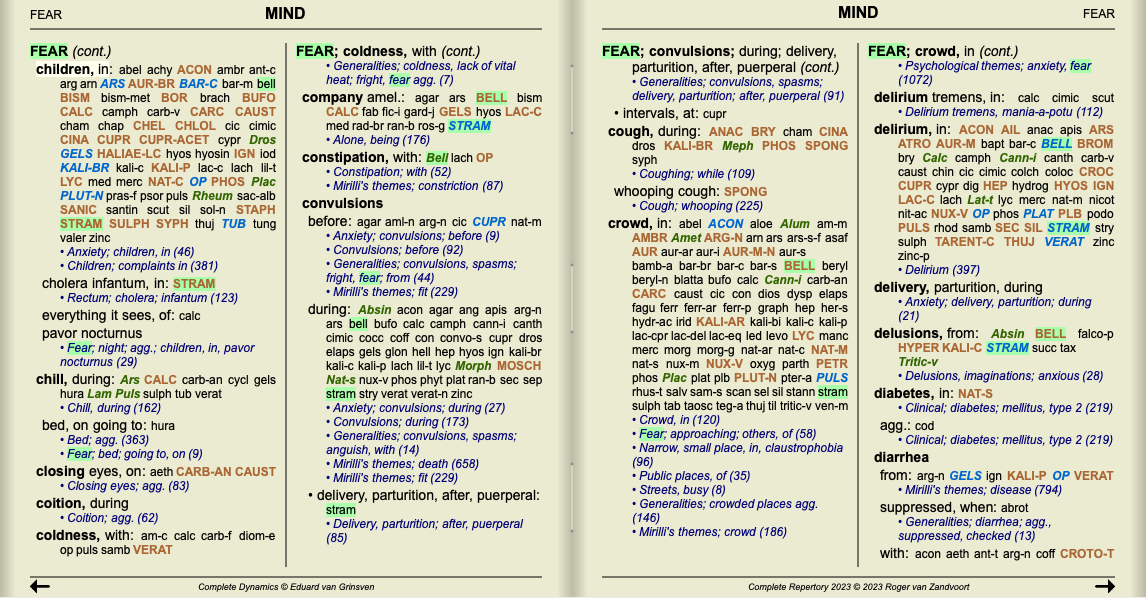
Like in the Find module, the Book module can highlight the text and remedies of the Find query.
In the following example, the remedies looked for were the nosodes. You can now quickly see which nosodes are in which rubrics.
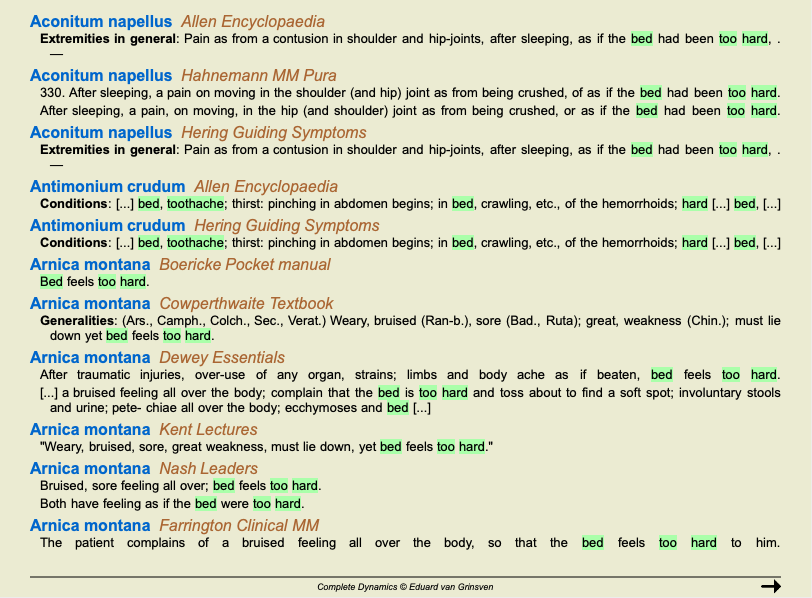
When looking for text in the Materia Medica, the words found are highlighted. In the following example, the text looked for was 'bed too hard'. Note that 'toothache' is also highlighted, because it also starts with 'too'...
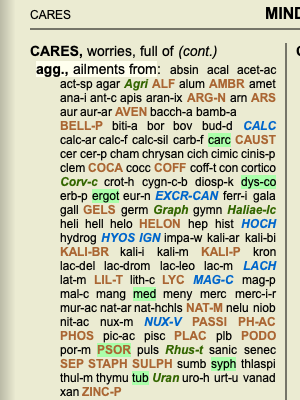
In the Materia Medica module, the highlight is not only applied to words, but also to the sentence that you clicked on in the Find module. The sentences are highlighted with a lighter color than the words.
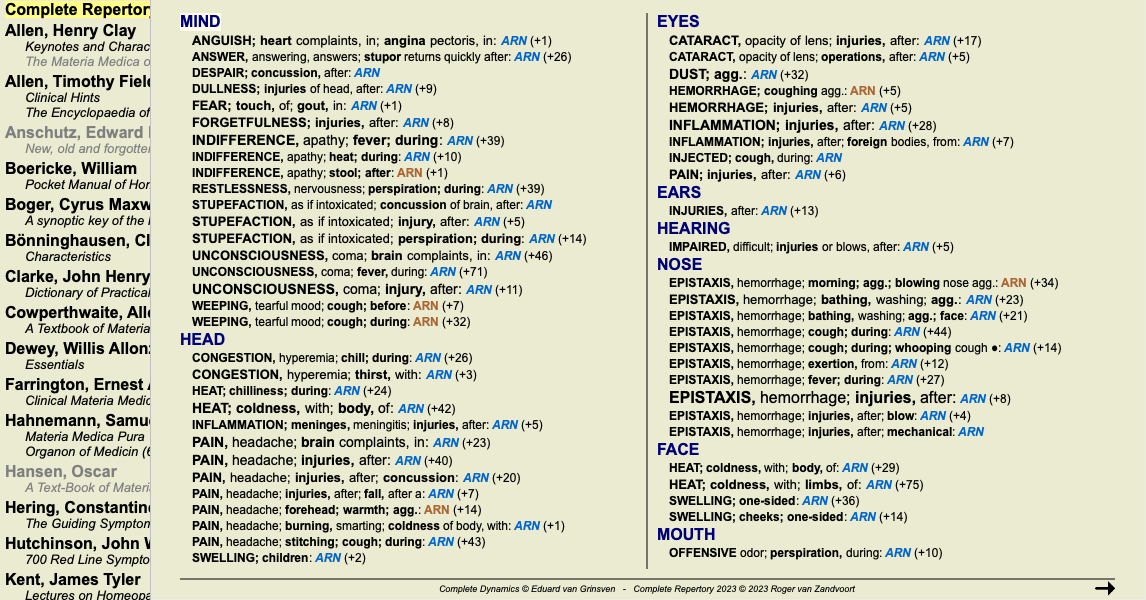
In the Find module, Differential Diagnosis shows a list of relevant remedies for all rubrics that are found, similar to an analysis. (Menu option View / Remedies / Show DD remedies, toolbar button ![]() , popup menu option Remedies / Show DD remedies).
, popup menu option Remedies / Show DD remedies).
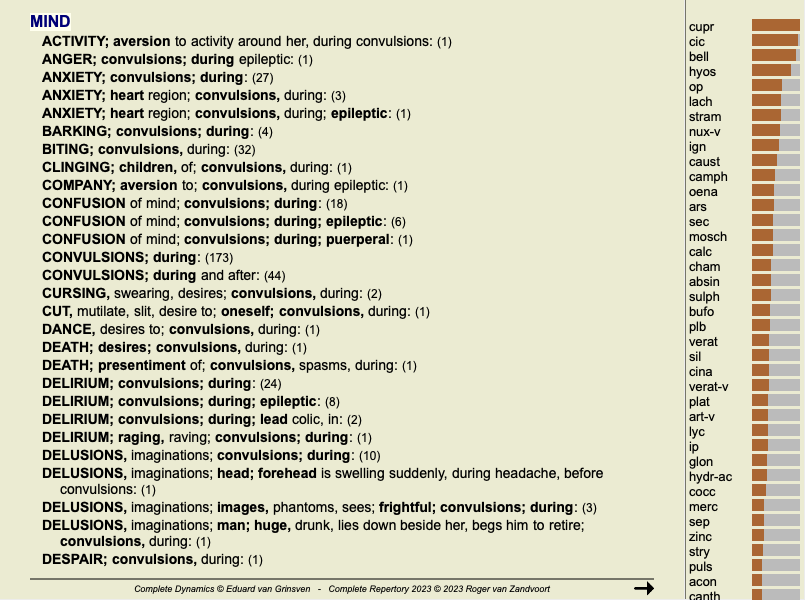
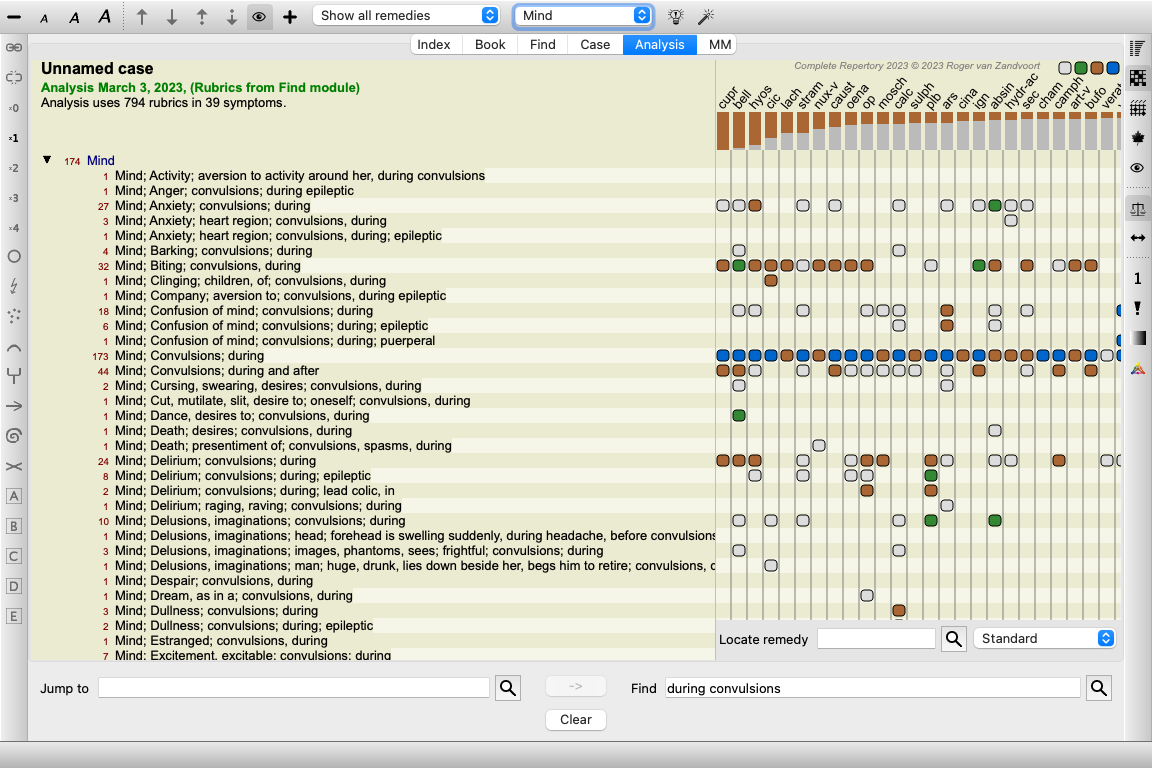
In this example, after looking for during convulsions :
To get full details about all rubrics used in the differential diagnosis analysis, press button ![]() . This will create a temporary table style analysis of all rubrics, organized by repertory section. The analysis is stored in your current case and will be deleted when you close the case.
. This will create a temporary table style analysis of all rubrics, organized by repertory section. The analysis is stored in your current case and will be deleted when you close the case.
Please note that it is not very useful to do this when more than 1000 rubrics are found.
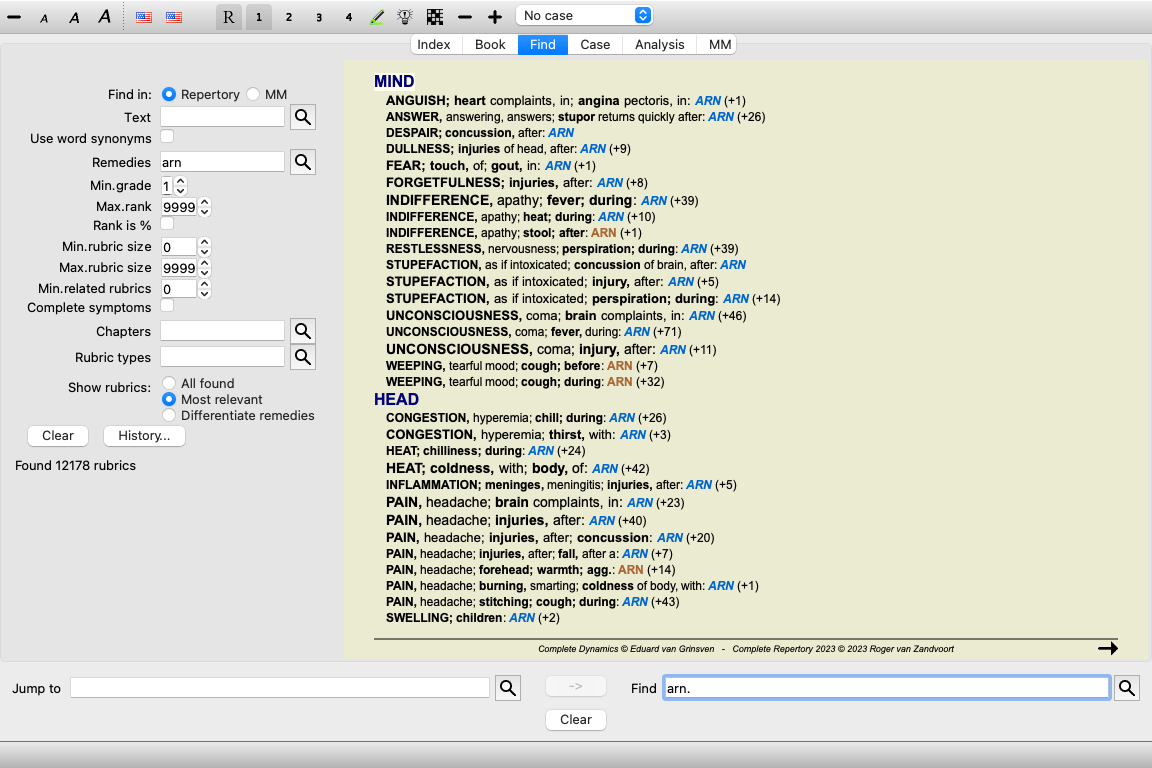
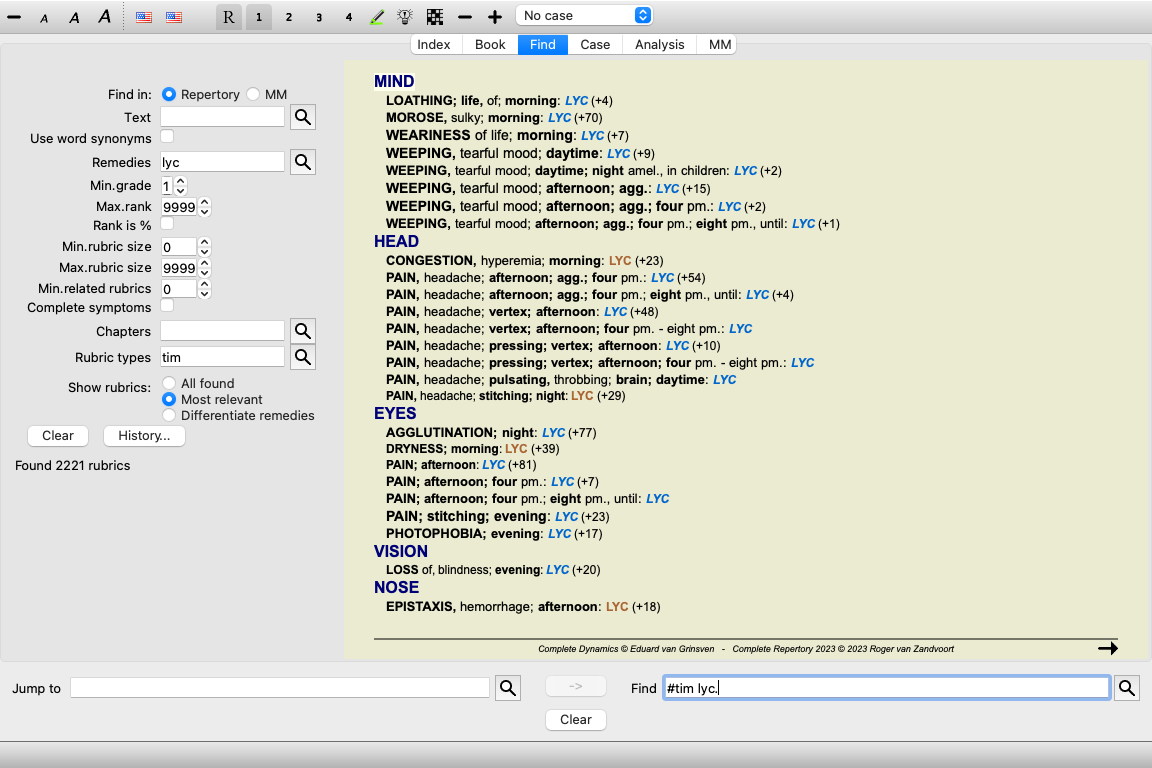
When searching for the most relevant rubrics for one or more remedies, the results shown are limited to the most relevant rubrics.
In case you are looking for a single remedy, the result will be exactly the same as when you look for that remedy in the Reverse Materia Medica. This makes sense, since that is exactly what the Reverse Materia Medica is intended to do. As an example, let's take a look at the most relevant rubrics for remedy arn.
When you are looking for more than one remedy, the most relevant rubrics for any of the remedies will be shown. When looking for a remedy family, like for instance spiders, the result will not be the same as when you open the Reverse Materia Medica for the spiders family. The Reverse Materia Medica will do an analysis based on the family as a whole, compared to other families, whereas the Find module will look at the results of each individual family member.
You can use all the powerful Find possibilities, to look for specific relevant rubrics.
For example, the most relevant time criteria for Lycopodium.
You can used the toolbar buttons ![]() and
and ![]() to show fewer or more rubrics.
to show fewer or more rubrics.
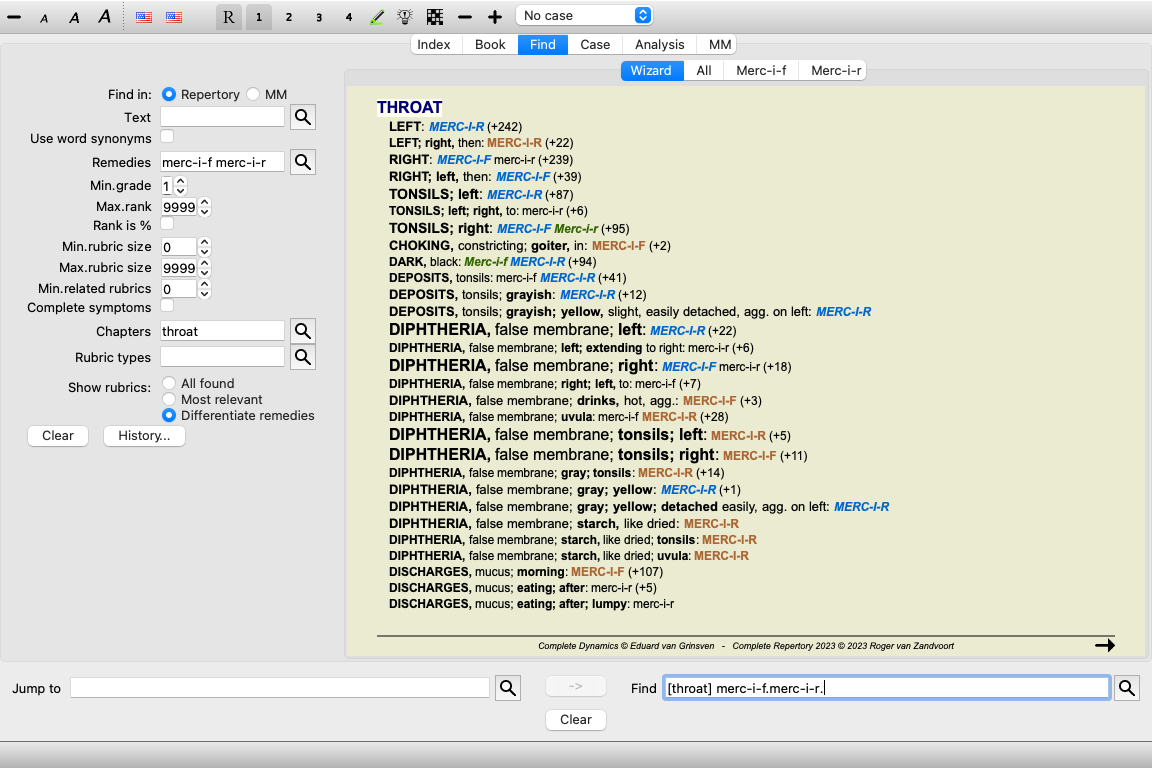
This extremely powerful function allows you to search for symptoms that best differentiate between two or more remedies.
It can be used to study the differences between two remedies, but also to find the relevant differences within a larger group of remedies.
All the powerful criteria of the Find module can be used to focus on specific areas of interest.
The rubrics that are selected generally fall into the following categories:
As an example, let's take a look at the most important differences between the remedies merc-i-r and merc-i-f in throat symptoms.
You can use the toolbar buttons ![]() and
and ![]() to show fewer or more rubrics.
to show fewer or more rubrics.
Note that when you differentiate among a larger number of remedies, a rubric is considered more important if it helps you better split the remedies in two larger groups.
For example, if you want to differentiate 10 remedies, 5 agg. / 5 amel. distinguishes better than 1 agg. / 9 amel. Or if a symptom is known for 5 of the 10 remedies, that distinguishes better than if it is known for 8 out of 10.
As an example, let's differentiate the modalities of the family Ranunculacea.
You will see that the symptom Ailments from excitement is rated very high, because it separates about half of the family members from the other half.
A new checkbox Recent has been added to the Case module.
If you check the option Recent, only cases are shown that have been modified recently.
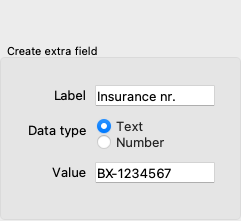
If the standard information you can enter for a patient is not sufficient for you, you can add extra fields yourself. This way, you can easily manage all information according to your personal way of working.
To add new fields to the case information, press the + button at the right side of the screen.
You can now enter a name and a value for a new field.
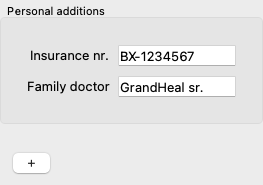
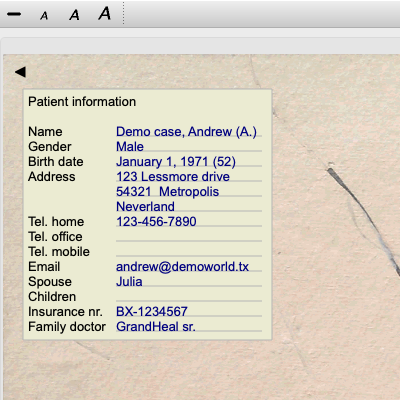
After adding new fields, the fields are automatically present every time you edit the patient information. In this example, two new fields have been added.
The new information is also shown in the patient information section of the Case module.
Your personal fields disappear automatically when there is no longer any case in which they are used.
Normally, your cases are stored in a case database which is only available on your own computer. There are situations in which you would like to make some of your cases available to others.
With the Case Sharing functions, you can make an export of selected cases, which can then be imported by someone else. It this situation, the imported cases become part of the other user's case database.
There are however situations, in which it is not the intention to incorporate your cases into someone else's private case database. Here a Shared Case Database is the solution.
A Shared Case Database is a database file, outside your personal case database. It can contain cases, exactly like your normal case database.
The file is stored in the Complete Dynamics folder, under your Documents folder.
It can be shared with others, by giving them the file, or by placing it on the internet. When another user copies the file to his own computer, he can open the database and has access to all the cases.
To protect the information against unintended use, the file can be protected by a password.
You can easily create a new Shared Case Database. (Menu option Case / Case database / Create new shared case database, popup menu option Case database / Create new shared case database).
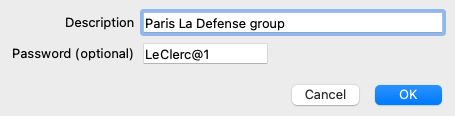
A dialog opens:
You can enter a short description of the intended use of the shared cases.
In order to avoid unintended access to patients' personal information, we strongly recommend specifying a password.
Press OK and a new file will be created in your Complete Dynamics folder. The name is based upon your name, and the text you entered in the dialog field Description.
The new case database is automatically opened.
You can open a Shared Case Database. (Menu option Case / Case database / Open shared case database, popup menu option Case database / Open shared case database).
A dialog will open, showing you the names of all Shared Case Databases, installed in your Complete Dynamics folder.
Select the correct file, and press OK.
While a Shared Case Database is opened, you can change its associated information. (Menu option Case / Case database / Edit case database info, popup menu option Case database / Edit case database info).
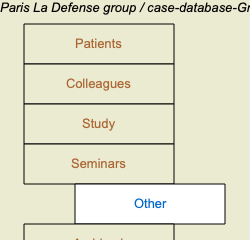
Note that under group Patients, you find cases that are created by you. When you use someone else's Shared Case Database, you will quite likely find the cases under the Colleagues group.
You can at any moment go back to your personal case database. (Menu option Case / Case database / Use standard case database, popup menu option Case database / Use standard case database).
A Shared Case Database works exactly like your personal database. This means you can create cases, just like you always do.
You can also use all the functions of Case Sharing, to export and import cases, or synchronize changes with other people using the same Shared Case Database.
We have added a very powerful mechanism to quickly move cases to and from your personal case database. (Menu option Case / Case database / Transfer cases, popup menu option Case database / Transfer cases).
On the left side, you see the cases in the opened Shared Case Database. On the right side you see the cases in your personal case database.
With the buttons at the bottom, you can quickly copy or move the selected cases to the other side.
Selection of the cases works exactly as usual. In this dialog, you can select multiple cases instead of a single one.
Select or unselect a case by clicking on it.
You can select a range of cases by dragging the mouse over the entries.
When copying a case that is already present on the other side, the other case will be replaced by the one you copy.
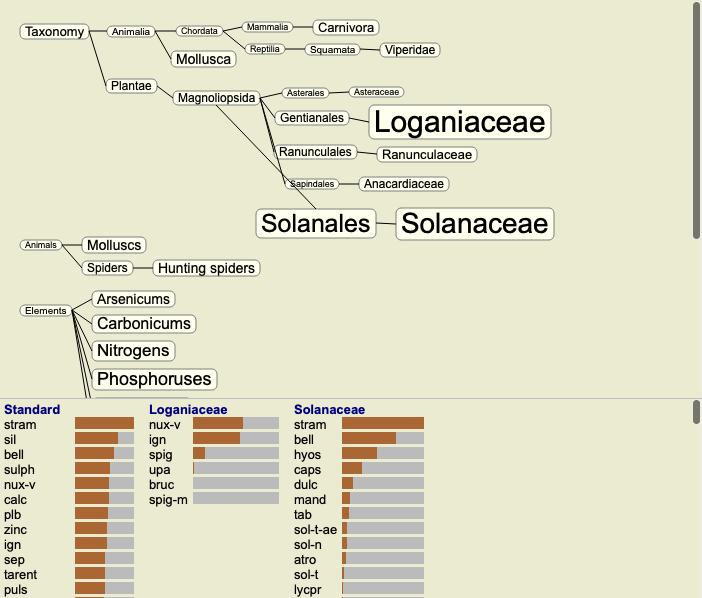
An analysis view for Kingdoms & Families can be selected. (Menu option Analysis / Kingdoms & Families, toolbar button ![]() ).
).
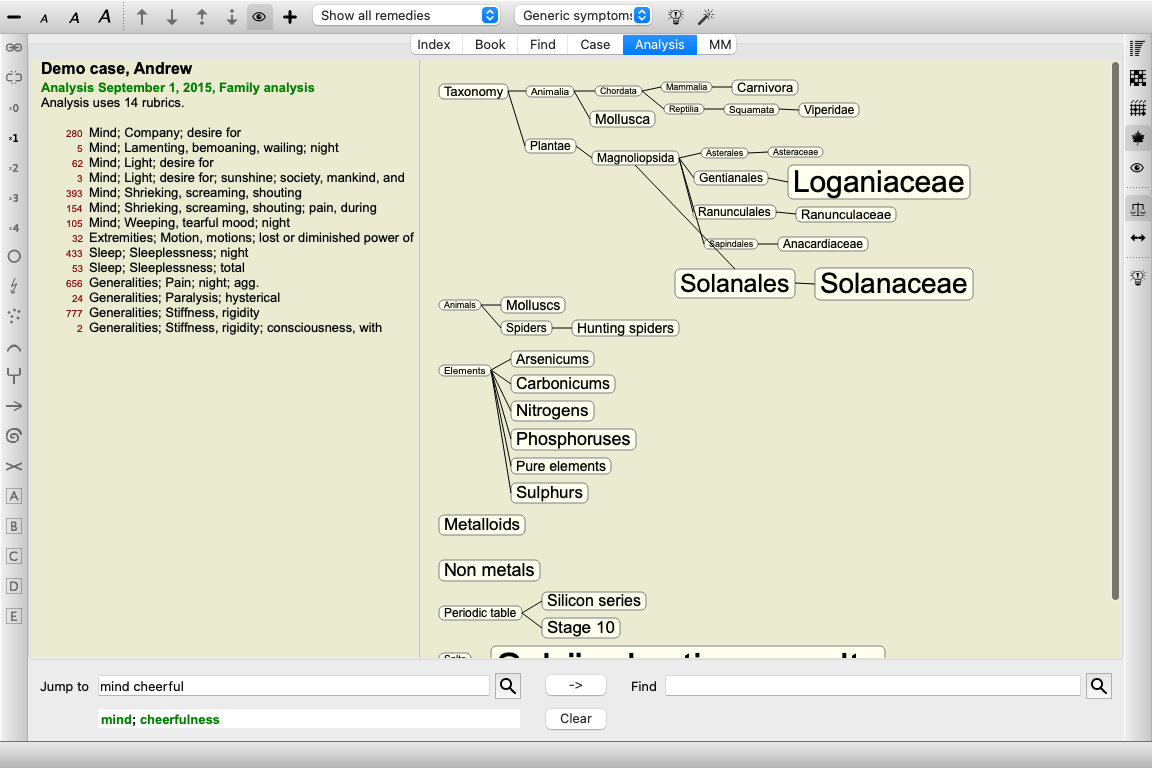
The following example shows a case in which Stramonium was the selected remedy.
In the family analysis, the more relevant families are drawn larger than the less relevant families. The families that appear to be of very low relevance, are not drawn at all.
In the example, you see that the most relevant families are the Solanaceae and the Loganiaceae. The Solanaceae are evident, since Stramonium is a member of the Solanaceae. But you would probably like to know why the Loganiaceae are considered relevant too.
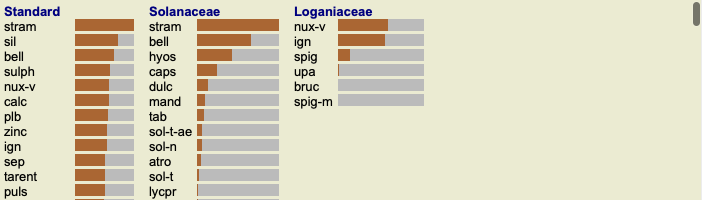
Double click on Solanaceae and on Loganiaceae. Extra information is now shown, in the form of multiple analysis results for each family. The first analysis list is a generic analysis for all remedies.
Whenever you double click on a family in the graph, it is placed at the left side of the added families. So if you were now to click again on Solanaceae, it would be placed between Standard and Loganiaceae.
You can show or hide this extra information any time you want. (Toolbar button
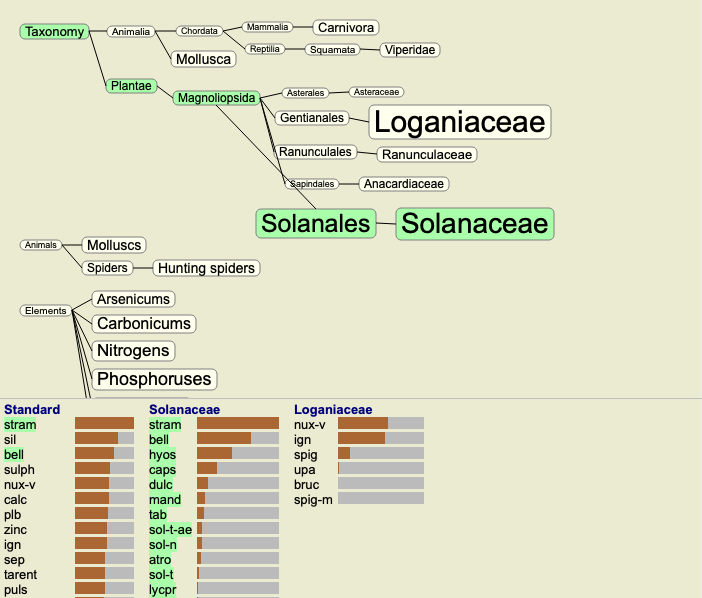
When studying the relevance of families in an analysis, you need to be able to see the relationships between families and remedies.
Just click on a family in the graph to see how its remedies score in the analysis. You will notice that the corresponding families are also highlighted in the family graph. This allows you to quickly see how families are related.
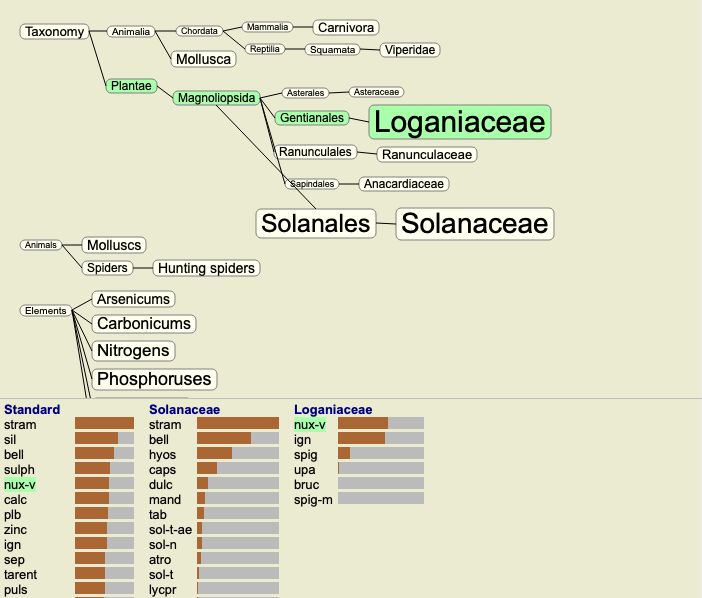
If you click on a remedy name, that remedy will be highlighted in the different analyses. Also, all families which contain that remedy are highlighted in the graph.
The Analysis module offers a powerful filtering mechanism, based on the remedies in rubrics.
With this filter, it is easy to limit the remedies in the analysis to remedies that occur in a given rubric ("elimination"), or combination of rubrics.
The filter is configured using a number of options in the menu bar (Menu / Analysis / Filter), or the popup menu.
The available options are:
You generally start by setting the filter to a given rubric, because you expect your remedy should occur in that rubric. You then fine-tune the filter with restrict ("should be present here too, show me less"), or extend ("actually it's ok if it is here too, show me more") the filter.
In the family analysis graph, you can quickly modify the remedy filter based on families. The filtering options are found in the popup menu on a family. The options are the same as described above for the Rubric based filter.
Using these filter options changes the remedy filter in the other analysis results. The family analysis graph itself is never filtered, because it does not consist of remedies but of families.
You can easily filter the analysis results on any family that any remedy is part of. The family filter is available in the popup menu of a remedy.
The next step after having made an analysis is generally the Differential Diagnosis. Based on the outcome of the analysis, a number of remedies are considered relevant and a differentiation has to be made among them.
There are a few different approaches to this.
Part of this study is to be done using the Materia Medica.
Most of the work can however be done using the contents of the repertory.
The special Differential Diagnosis function of the Analysis module helps you with that. It forms an easy to use connection between an analysis and the Find module's capability to differentiate remedies.
We'll show how it works by means of a few examples.
The following analysis can be found in the demo case Andrew, and is called DD example - Sepia case.
Although Sepia scores highest, this does not necessarily mean that it is the remedy to prescribe. In this case, we wanted to differentiate Sepia and Nux Vomica, because these remedies are complementary, and both score relatively high in the analysis.
Start the Differential Diagnosis. (Menu option Analysis / Differential diagnosis Wizard, toolbar button ![]() ).
).
A dialog opens:
In this dialog, you will notice 3 sections.
You can move this dialog to a convenient position on the screen, and leave it open to quickly modify the DD criteria. At any time, you can close it with the Close button.
Click the Apply button to start the DD with the selected criteria. The Find module will open, showing the most differentiating rubrics for the selected criteria.
The rubrics shown are now mostly Head symptoms, so we click the button
This gives you a good impression of the relevant differences between both remedies, for the selection of symptoms used in the analysis.
Since the results are shown in the Find module, you can immediately add relevant rubrics to your analysis, and thus modify the outcome of the analysis in accordance with the new information provided.
The following analysis can be found in the demo case Andrew, and is called DD example - Ferrum case.
We now leave it up to you to experiment with the options to select specific symptoms and rubric types, and see how that changes the results.
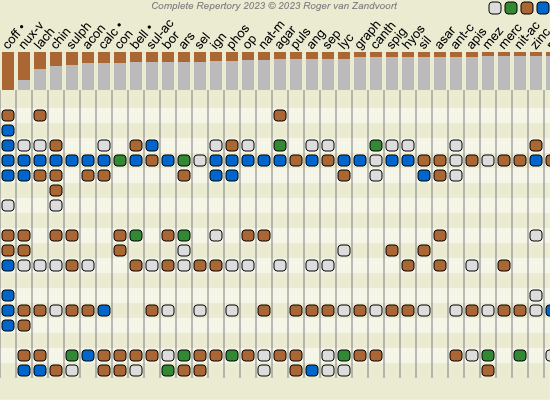
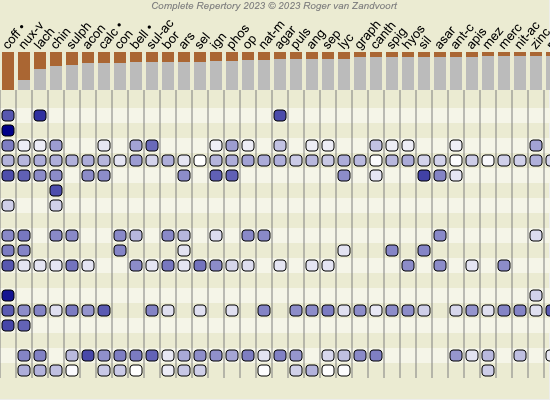
In the Table and Grid analysis graphs, remedies are shown according to their grades, in 4 different styles. In the calculation of the analysis formulas, a more refined value than just 1-2-3-4 is used for each remedy. It can be important to see how heavily each remedy is weighed in the analysis results. This is especially important in case you are applying your own analysis formulas.
You can show the relative importance of each remedy by clicking ![]() . (Menu option Analysis / Show relative importance, toolbar button
. (Menu option Analysis / Show relative importance, toolbar button ![]() ).
).
In the Table view, remedies are then shown as a square with a light to dark color. The darker the color, the more relative importance is given to the remedy in the analysis.
Please compare the following two pictures of the same analysis. The first picture shows the remedies with grades 1 to 4, the second picture shows the remedies according to their relative importance for the analysis.
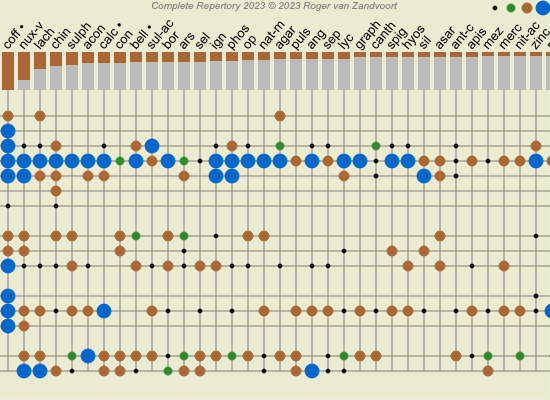
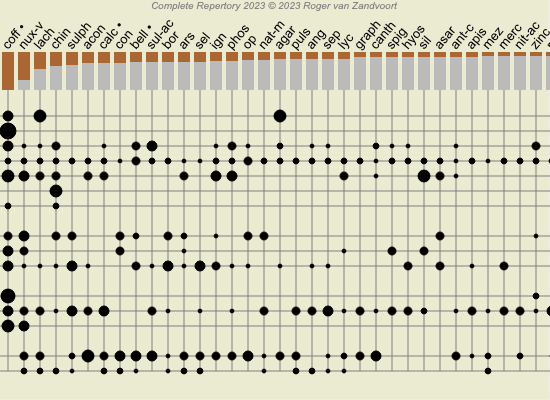
In the Grid view, remedies are normally shown in different colors and with different sizes. When showing the relative importances, all remedies are drawn with black dots with a variable size. The larger the dot, the more relative importance is given to the remedy in the analysis.
The most common analysis methods are built in standard in Complete Dynamics. For most users, these formulas are all they will ever use.
You can create and customize your own formulas according to your own preferences and professional experiences.
To create a new analysis formula, open the Preferences, section Analysis.
Select one of the existing analysis formulas and press the ![]() button. A new analysis formula is created, which you can modify yourself. This new formula starts with the settings of the analysis that you had selected in the list.
button. A new analysis formula is created, which you can modify yourself. This new formula starts with the settings of the analysis that you had selected in the list.
Please note that it is not possible to change the settings of any of the standard analysis formulas. You can only change formulas that you have added yourself. You can look at the settings of the standard formulas, to see how they are configured.
With the slider editors, you can give more weight to several factors in the analysis formula. The more the slider is moved to the right side, the more value is given to that part of the formula.
In the descriptions below, several options use the words related rubrics. When one rubric is a generalization of a more specific rubric, the more specific rubric is called a related rubric of the more generalized rubric.
For instance: Head; pain; morning; agg is more specific than Generalities; pain; morning; agg.
Likewise Head; pain; morning; agg is more specific than Head; pain.
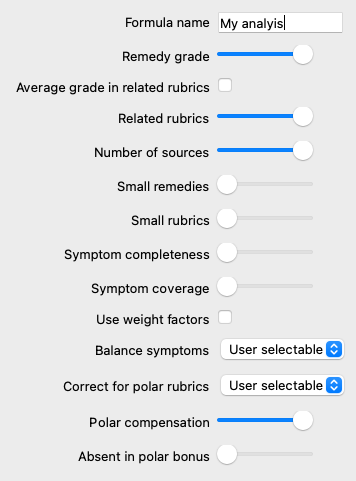
| Formula name | Here you can enter the name that you want to give to this formula, for example Fred-1. This is the name that will be shown for the analysis in the Analysis module. |
| Remedy grade | Sets the importance that will be given to the grade of a remedy in a rubric (1 to 4). In the lowest setting, all remedies are treated as having grade 1. A higher setting makes the difference between grades 1 and 4 more important. |
| Average grade in related rubrics | When this option is checked, the remedy grade is corrected with the grades of the same remedy in related rubrics. If the remedy has grade 4 in a rubric, but a lower grade in most related rubrics, then the lower average value is used. When not checked, remedies are always given the grade that is shown for the remedy in the given rubric. |
| Related rubrics | If a remedy also occurs in related rubrics, extra importance can be given if it occurs in more related rubrics than other remedies. The higher this setting, the more the occurrence in related rubrics is considered important. |
| Small remedies | Small remedies are remedies that are not widely covered in the repertory, like the polychrests. Polychrests tend to be shown relatively important in an analysis, because they occur in many rubrics and often have higher grades. With this setting, more importance can be given to the smaller remedies. |
| Small rubrics | Rubrics with many remedies are often very generic rubrics. Very specific rubrics often only have only a small number of remedies. These smaller rubrics can be very important to an analysis, because they could point to a remedy that would otherwise be overseen. With this setting, more importance can be given to the remedies in these smaller rubrics. |
| Symptom completeness | Every rubric in the repertory is a combination of several types of information. Some rubrics only talk about a time modality. Other rubrics talk about a specific phenomenon, in relation to a time modality, or an extension, etc. etc. The more a rubric covers multiple of these aspects, the more specific it describes a symptom. With this setting, more importance can be given to complete symptoms verses generic symptoms. |
| Symptom coverage | Each remedy occurs in a number of Symptoms and Rubrics. The more Symptoms and Rubrics are covered by the remedy, the more important the remedy might be for the analysis. With this setting, more importance can be given to remedies that cover a larger number of patient symptoms. |
| Use weight factors | In the analysis, weight settings can be assigned to Symptoms and Rubrics. With this option checked, these weights are used in the analysis formula. With this option unchecked, weight settings are ignored. |
| Balance symptoms | This setting determines how the Symptom Balancing feature of the Complete Dynamics analysis is used. Always: Balancing is done always. Never: No balancing is done. User selectable: The setting is controlled with the |
| Correct for polar rubrics | This setting determins how correction for polar rubrics is done. Always: Always correct for polar rubrics. Never: Do not correct for polar rubrics. User selectable: The setting is controlled with the |
| Polar compensation | Determines how strongly correction of polar rubrics is done. With the highest setting, a remedy is completely compensated for the occurence of the remedy in a polar rubric. |
| Absent in polar bonus | To give more importance to a remedy if it is not present in the polar rubric. |
It is very simple to create an analysis formula that is entirely useless. Use these options wisely. The standard formulas have been chosen very carefully.
When you make your own analysis formulas, it may seem difficult to adjust all settings to their optimal values.
In the Analysis module, you can show the results according to their relative importance instead of simply their grades 1 to 4.
This can be of great help in verifying whether your analysis formale has the settings like you want.
See section Analysis module / Advanced topics / Show relative importance for more details.
To get full details about all rubrics shown in the Reverse Materia Medica, press button ![]() . (Menu option Analysis / Table, toolbar button
. (Menu option Analysis / Table, toolbar button ![]() ). This will create a temporary table style analysis of all rubrics, organized by repertory section. The analysis is stored in your current case and will be deleted when you close the case.
). This will create a temporary table style analysis of all rubrics, organized by repertory section. The analysis is stored in your current case and will be deleted when you close the case.
In addition to making a Reverse Materia Medica for a single remedy, you can also search for the most significant rubrics for a given Kingdom or Family.
To select a family, enter the name between {}. The name you enter must match the name of one of the rubrics in the Kingdoms & Families chapter. To look up a name, press the ![]() button and then button Groups...
button and then button Groups...
The following example shows the Reverse Materia Medica for {spiders}.
You can create a new Materia Medica book. (Menu option MM / Create new Materia Medica book).
First you are asked to enter a name for the new file. This file is stored in the Complete Dynamics folder, under your Documents folder. Use a name that is meaningful.
Next, you are asked to enter details about your book.
For the author name, enter all fields that you know, the family name is obligatory.
The Book title is the formal title of the book.
The Short name is a short text, to quickly mention the book without having to give the full author name and title. This short name is used in the Find module, when displaying the results of searching in the Materia Medica.
If after having created the book you need to modify this information, open the editor for any remedy, and click the Details button.
To edit a remedy, first select the correct book and the correct remedy. You can then open the editor. (Menu option MM / Edit Materia Medica). If the menu option is disabled, editing is not allowed because you are not the owner of the book.
The editor supports several elements of text formatting.
Click the Apply button when ready, to go back to the normal book view.
To organize your Materia Medica into individual sections, add lines starting with ####, followed by a label.
This example creates three individual sections.
Besides editing individual remedies, you can also create chapters that are independent of a remedy.
To create additional chapters, open the editor for any remedy, then click the Chapters button. A dialog will open, allowing you to create chapters, and order their sequence.
All chapters that you create will appear in the index. (Popup menu option Index).
To share your Materia Medica books with others, all that is needed is the file you created. Your Materia Medica book file has the extension .rep.
Note that others will not be able to further edit your book. Editing is restricted to the original author.