It many situations, you may want to give one of your cases and/or analyses to a colleague, a fellow student, a teacher, or maybe publish it on an Internet forum.
Complete Dynamics offers you the possibility to export a case, full or only partial, to a file. This file can then be given to your colleague, and be imported on his/her computer. Your colleague does not need a Practitioner Edition license for this, with the free Browser Edition the file can also be imported and looked at.
Case sharing can also be done anonymously, thus ensuring the personal privacy of your patient and you.
How exporting and importing is done, is described below. First we'll look at another important feature of Case sharing.
Manual synchronization is relevant only if you have opted not to use the automatic synchronization via the Cloud Server.
With Case sharing, you get two powerful options to take cases from one computer to another.
The easiest way is to export a full copy of your case database on one computer, and import it on the other computer.
This replaces all case information stored on the other computer.
This option can also be used to regularly create a backup of your case database.
The more advanced way is to export only the cases that are modified on one computer, and import them on the second. In this situation, only the modified information is copied and merged into the database on the second computer. This powerful synchronization mechanism even works when a case has been modified on both computers!
To export a single case, open the Case module and select the case that you want to export.
Then, use option Export current case... (Menu option Case / Sharing / Export current case..., control-Y, popup menu option Sharing / Export current case...).
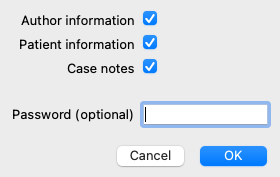
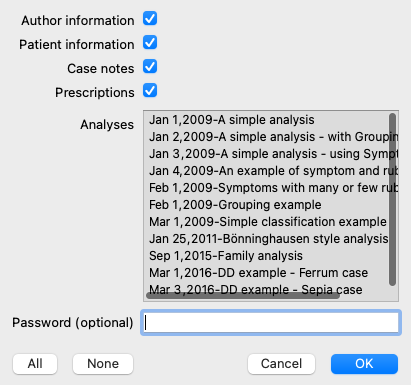
A dialog opens, allowing you to select which parts of the case you want to export:
| Author information | If you uncheck this option, your name is not included in the export. |
| Patient information | If you uncheck this option, the patient is made anonymous. Only the patient's gender and year of birth are used. If this option is checked, all the patient's personal information is included in the export. |
| Case notes | With this option checked, your case background information is included in the export. (Case background, notes, and groups). |
| Prescriptions | With this option checked, the prescriptions you have made are include in the export. |
| Analyses | For every analysis in the case, you can decide whether you want to export it or not. Click on a line to toggle the selection on/off. The buttons All and None can be used to select all or none of the analyses, for easier selection. |
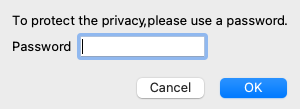
| Password | If you enter a value here, the export file is protected by a password. In order to be able to import it, someone has to know the password. We recommend to use a password for any information that you share, except for anonymous cases that you want to publish for everybody on the Internet. |
When you are ready, press the OK button, and you will be asked for a file name and location of your choice.
A default file name is already filled in, but you can choose any name you want.
To export a single analysis, open the case that contains the analysis, and select the analysis you want to export.
Then, use menu option Export current analysis... (Menu option Case / Sharing / Export current analysis..., popup menu option Sharing / Export current analysis...).
A dialog opens, allowing you to select which parts of the case you want to export together with the analysis:
For the meaning of the fields, see the information above.
You can export multiple cases into a single file. (Menu option Case / Sharing / Export multiple cases..., popup menu option Sharing / Export multiple cases...).
In the list with cases, select the ones you want to export by clicking on them.
You can select a range of cases by dragging the mouse over the entries.
When someone else has given you a case or analysis export file, you can easily import it with menu option Import. (Menu option Case / Sharing / Import..., control-I, popup menu option Sharing / Import...).
You are asked for the file you want to import.
After selecting the file, it is imported into you case database. In case the file is password protected, you are asked for the password first.
You can find the imported case under group Colleagues if the author name was in the file, otherwise you will find it under group Other. After opening the case, you can easily change the case information yourself, or move an analysis to one of your other cases. (Menu option Case / Move analysis to case...).
When you export your entire case database, it can only be imported on a computer that has a license that is registered under your name.
To export your entire case database, use menu option Export complete Case Database... (Menu option Case / Sharing / Export complete Case Database..., popup menu option Sharing / Export complete Case Database...).
A dialog opens, allowing you to provide a password to protect this file (highly recommended).
After pressing the OK button, you will be asked for a file name and location.
Take the file to another computer, and there do Import. (Menu option Case / Sharing / Import..., control-I).
Exporting modified cases is the most flexible way to synchronize case information between multiple computers.
To export modifications, use menu option Export modified cases. (Menu option Case / Sharing / Export modified cases..., popup menu option Sharing / Export modified cases...).
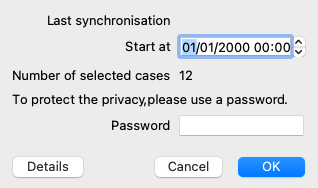
A dialog opens, allowing to to specify what needs to be synchronized:
By default, the date of the last synchronization is filled in. In case you want to synchronize all modification after another date and time, just change the value.
To get an overview of which cases will be included in the export, press the Details... button to get a list of the cases and their last modification times.
The modified cases can be imported on another computer. (Menu option Case / Sharing / Import..., control-I, popup menu option Sharing / Import...).
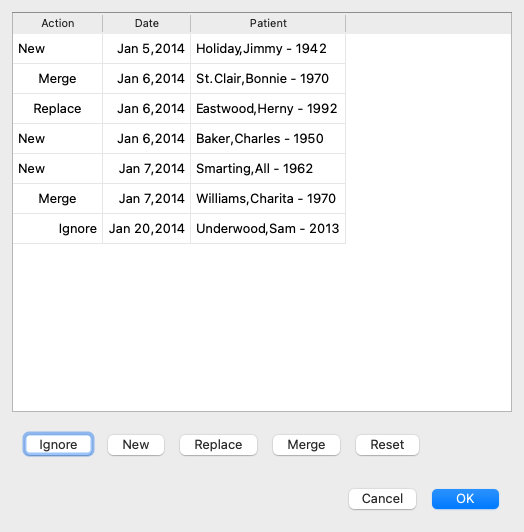
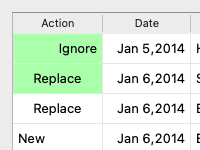
After selecting the file, a dialog opens showing information of the synchronization actions that are needed:
The important part here is the leftmost column. This column can have four different values:
| New | The case is not present in the local database. It will be newly created. |
| Replace | The case is not modified in the local database, but the version in the export file is newer. It will be overwritten with the new information. |
| Merge | The case has been modified on both computers. The information in the export files is merged into the information in the local database. No existing information is overwritten, but new information is copied in. |
| Ignore | This case appears not to be modified on any of both computers. Nothing is done. |
You can modify the action for any of the cases in the list. Select a number of cases by clicking on them, and then press any of the buttons Ignore, New, Replace, or Merge. Pressing button Reset will restore all actions to their original setting.
Any modified settings are highlighted with a color, to indicate their value is different from the original setting:
When an action is explicitly set to New, the case will be copied as a new case, even if a similar case is already present in the local database. You can do this when you are in doubt, after the import you will then see two cases with the same name that you can verify yourself. Normally, this is never necessary, the option Merge will not throw away any information.
In order to facilitate making backups, the program automatically creates a full case database export once every day. These backups are kept for the last 7 days. With this you can make your own backups, without having to know where the program stores its internal databases. In case you need to know more about where the backups are, and how to restore them in case of emergency, please contact the support department. (Menu option Help / General feedback).